
On this page, the original layout is shown and then the first major extension is built, rails laid and fully tested. The trials and tribulations are described in some detail.
Then there is some general advice on layout building with some expert advice from one of our readers. We then review two free cad-cam packages which can be used to visualise your layout before building.
Then we have the Layout Extension built in 2011. If you have visited before and read the above then this takes you straight to the New Extension. Jump to new extension
This is an overview of the current layout Jump to Current Layout which is being added slowly to this page. There is something there and I will be adding to it. Probably worth a jump to see what is going on.
 When I started this layout I knew very little about Hornby Dublo (HD) and nothing at all about railways. I lived in SE England which was dominated by electric Multiple Units (EMUs) with the only steam engines being the Victoria to Oxted line behind a BR standard 4MT and the Golden Arrow headed by a Bulleid Pacific. There must have been other steam available but I didn’t take any notice.

So when the first layout was built I did not realise that there were large radius curves as well as standard ones so I built three running tracks which left big gaps between the curves. This was not a problem as I filled them with sidings. (More track, More trains… remember)

Then I added a turntable and more sidings to the LHS of the running lines. It stayed like this for a long time as I slowly built up the running stock. Then came the day when we had run out of track to keep all the engines and their trains so an extension was built at right angles to the right hand side.

This was used as a carriage siding with some sidings for their engines at the top. This was a good layout. Engines could take different trains of carriages or freight wagons and all had direct access to the two outside lines via interconnecting points. It lasted until yet again I ran out of track to house the growing collection. Yes they could have been stored in boxes but where is the fun in that.

So we come to the current layout. When I was building it I wrote a blog on the progress and this is copied below.
I had forgotten how long it took me to get the original layout to run properly. Now everytime I run a new train we have derailment and disconnect problems. The Co-Co won’t run at all probably due to its slightly oversize traction tyres, so they will have to be changed. The Flying Scotsman de-railed its tender, the 2-6-4T derailed its bogie, the LMS train coal trucks de-railed and de-coupled etc etc. Points have been changed, new sections of track added, changed, moved etc. Every time there is a new train there is a new problem. I now remember the problems that I had before and they are all reappearing. Its the fact that the track is 50 years old and probably some time in its history has either been trod on or screwed down or both causing it to be less than true. This is 
combined with the fact that the transition from the oval layout to the new sections are at an angle which makes fitting the correct sections very difficult. The problems continue and no end is in sight at the moment. Although the running track has its own problems they pale into insignificance compared to the points. These are the classic derailers and looking at them there seems to be no obvious reason for it. I change them but then forget to isolate them from the rest resulting in them being used again – I must get a better system. The problem is that sometimes they work well in a different place on the track so its best not to throw them away.
Three of the large radius curves that came with the job lot I bought in the Summer are the cause of problems. One seems to have a pinch point in the rails which causes the trucks especially to wobble and the uncouple. – no obvious problem on close inspection but there is one there. Another couple do not fit well and again can lead to bogie wheels jumping off the track. This problem will hopefully be overcome by the purchase of 8 large radius curves from ebay last weekend. These were bought for £12 including postage which again was a great price – need to look at the state of the rails before declaring them a bargain.
They looked good in the pictures but that can be misleading as every one knows who buys from ebay. Otherwise its the points that continue to be their normal problem but I have enough to change out so slowly we are getting there. The CoBo now runs OK on the down line but refuses to reverse over points to get out of a siding so there is still work to do.

Today I started screwing down the new running tracks. Even being very careful and running “sensitive” locos after every couple of screw had been put in it still turned into a de-railing nightmare. I think that this old track benefits to some extent by have the flexibility of being loose laid but also has the problem that after many circuits some of the rails especially on the curves begin to part causing their own problems. So its a dilemma. I have decided

to screw down the running lines but only every other rail or so and leave the sidings loose at the moment. Not sure that this is where I will end up but its a good place to start.
For those of you who have read the comments you will know that Nigel Clark advised me to add a small peice of sponge foam under the front bogie of the 2-6-4T to prevent it de-railing. I did this on 80033 last night and it worked a treat, so I  followed it with 80054
and today I also added the magic foam to the Wrenn bodied one. Actually this still had a problem when shunting so I might have to modify it a little but it ran well on the main line. In fact you can easily see that the foam stops the bogie from bouncing high enough to derail but does not prevent it from rounding the curves etc. A
little more trial and error is necessary but I think that I am on a winner.
I had forgotten how long it took to get the extension running and the frustrations involved, it was good that I published this blog as I could look back and remember the pain.

Some observations:
– Test every piece of track that you lay down with a “sensitive engine”
– Buy the best points that you can afford – they can be a pain and its very difficult to see what the problem is
– Minimise the use of X crossings, they always produce a problem
– You will need to recheck every piece of track that you screw down as all the problems can re-occur
 -If you have a long layout you need to add electrical boosters, wires from the controller to various rails around the layout. My layout has 3 boosters per track.
– The basics are very simple. the final layout can be frought with minor problems
HD layouts will never be free from ghost de-coupling – accept it – otherwise you will go mad trying to eliminate them. Trains that can spend 10 minutes circulating without a

problem can and will decouple one of their wagons, especially when you are not looking
Carriages are better than freight wagons for not decoupling
– HD engines will perform better on HD track than any conversion however well that it is done
– Enjoy the noise of metal wheels rumbling around the track

– “Genuine” 3 rail layouts do not have scenery and the only buildings should be those produced by Meccano
– HD plastic stations were introduced for 2 rail and the platforms are lower than the metal 3 rail ones.
My layout runs toy trains, it does not have a time table, the signals do not control the trains, they are there for interest, the hand of god works all the time as it is my layout and it is not meant to be authentic,

I do try to run pre-nationalisation trains on all three tracks rather than mix them up with e.g. LMS and BR. Diesels and BR steam are acceptable, short expresses with only 3 -5 carriages instead of 10-12 are inevitable, steam engines wait in sidings with their carriages ready to take the road. I have no electric points so remembering the point settings is important to stop derailments.
All of my trains reverse into sidings and stations ready to set off the next time they are put into service. This is prototypical for goods (freight) trains as otherwise the engine would be trapped at the end of the siding. It is very unusual for passenger trains as at mainline termini another new engine would be attached at the front for the next duty and the incoming engine moved to the engine shed once the train had departed. At smaller junctions the engine would uncouple from the train, be turned if there was an available turntable, and then run round its train and rejoin on the front. If there was no turntable the engine would come in chimney first and leave tender or bunker first. I do not have enough space for run round loops so that option is not viable. The mainline variant is very doable if you isolate the last rail in the station so that the incoming loco loses it power and a new loco could be added at the front. This would require a switch on the isolating rail so that this engine could then be let out of the station. Never tried it but it might well be worth ago.

There were some stations in the country where the train did have to reverse into the station, Dorchester for example, at least until 1970, but not many.
I also always run the twin track in up and down modes. This means that all the the trains on one track work the same way.
Whether you are going to build a classic layout or one with scenery it is important to include as many of the HD buildings as possible. So you will need signal boxes, red roof are the standard and the cheap ones, green roofs cost more money, island platforms, mainline station buildings, metal for 3 rail, in both cases platform extensions are available but they are reasonably rare, level crossing again it has to be the metal one for 3 rail. The standard level crossing is for single track, double track ones were made by specialists and are very handy but difficult to find now. Prewar their were wooden stations and signal boxes pretty rare but replica ones are available. Then you have the girder bridges again in metal and plastic, footbridges, and the poster signs.

Moving into the HD plastic era you have the freight station, the engine shed, plastic 2 rail versions of the island platform, mainline station and level crossing and the piece de resistance the Terminus Station with the all over plastic roof. This is very nice but rare and therefore expensive also you have to design your layout around one although it can be configured as a through station.
This hobby is relaxing, its fun, its not rivet counting, the engines do look like the prototype but they are not scale models. I am not a railway modeller, I am not a serious collector I just like to run tin plate around a track and sit back and enjoy it.

If you are thinking of setting up a new layout or modifying an existing one, you have two options. The first is to collect together all the rails you have and start loose laying them and modifying until you have the basis for the layout and then start actually laying the layout. This is good fun but time consuming. The second is to use a CAD programme and do it all on your computer before even touching a rail. This enables you to try many layouts, count the exact number of rails you want and make as many changes as you want. This method is even more time consuming and also a lot of fun.
CAD for a model railway that is over 50 years old I hear you say but its true.
Download Xtrkcad. Its only 2MB and won’t take up any room on your computer and its free.
Install and open it – you will be confused I guarantee it. Help is at hand. Click on File. Click on Parameters. In Parameters click on Browse. Scroll down until you come to Hornby3r.xtp click open. This file now appears in the Parameters click ok. Now go to Options. Click on options then click on layout. Put in room size and name but most importantly click on the drop down menu in scale and click on HO. This is because English OO trains including HD runs on HO scale track. You do not need to change anything else. Click on OK. This is not a simple programme so I advise you to click on Help and then click on Demos and spend a good bit of time going through the demos that they have.
Now you can spend long happy evenings planning your layout and with the wonders of the programme you can even add stations, level crossings, buffer stops, signal boxes and finally when it is all complete you can run a train around it. N.B. there is no turntable.
Then you can build your real layout and listen to the rattle.
David Simmons Advice
This is just excellent advice from David Simmons of use to all 3 rail runners. Fantastic information on points – really useful.
“I’m sorry to hear you are having all these problems. My experience of Dublo track (on and off for almost 60 years) is that it can be very troublesome, but can be beaten. It needs careful laying and only track that has passed rigourous inspection should be used.
A sheet of glass is useful to check that the rails are absolutely flat. Bases with obvious distortion should be either straightened if possible or scrapped. I avoid all track from the Korean war period (card insulators and steel rail are give aways). I also find that mixing wide and narrow tongues can sometimes give problems. The last section of curved rails is often straight, causing doglegs. Careful use of flat nose pliers corrects this – sighting along the rail shows up this one. Duchesses are near their limit on 15″ curves and don’t need any bad joints to worsen matters
Diamond crossings give trouble because the bakelite section in the middle warps (this also happens with uncoupling rails) and there is a bump between this and the metal part File smooth or scrap.
The real problem is, of course, the points, though I have not had particular problems with electric ones (it’s essential to check that the tiny spring underneath holds the point blades firmly over both ways however) . My investigations of these have revealed several problems. Firstly, the gauge through the blades widens to about 18mm. This is why fine scale wheels derail and only wide wheels like Dublo, Lima and later Tri-ang / Tri-ang-Hornby (This stuff is still Tri-ang to me despite usurping the Hornby name!) run through OK. Then, at the other end, the check rails are often bent out of shape and need restoring to their original form, so that the wheels are gently eased into line. Any burrs need removing obviously. Also check that the centre rail is level. Castles, 8Fs and 0-6-2 tanks in particular are prone to the collector shoes getting caught and derailing or shorting and stalling. Again flatness is essential.
I have found that some wheels are out of gauge (the back to back should be 14.2mm). This has to be corrected to avoid problems. A gauge or a vernier/digital caliper is necessary to check.
I’ve waffled on (as usual!) but a last point. To avoid uncoupling, all couplings have to be the same height (I have reserved one wagon with pristine couplings as my standard and all others have to couple and uncouple with this one). The hooks are ideally all the same (original) shape and it is essential that the actual coupling surface is vertical. Level track and attention to these points should mean unwanted uncoupling is rare.
I hope I’ve not stated too much that’s obvious, but I firmly believe in keeping them running rather than decaying away in some collector’s boxes.”
Thank you, David contributions welcome at any time.
Since this post David has sent me a follow up email with some further advice which is very useful and a picture of his now dismantled layout. Another runner, I hope that he gets a new layout soon.
“Hi Tony,
Thanks for your e-mail. Glad to be of assistance and the best of luck with your investigations. I’ve rescued some bad cases in the past., Corrosion and bad wear are the real killers.
The poorer examples can always be used in sidings or the loco depot where speeds are lower anyway. At worst, they can provide spare parts.

I would agree with you about 4MT tank bogies. they’re not quite heavy enough to take the coupling loads, especially with plastic wheels. I was going to try a phosphor bronze spring (like on the West Country), but have never got around to it. I didn’t have much success with the foam. The N2 (I have several of these) has never given bogie problems however. Possibly the axle is bent and the wheels don’t run true?
I’ve attached a photo of my old layout (now dismantled following a move, unfortunately) if you’re interested.
If you need any help don’t hesitate to ask.
Best regards,
David”
Judging by the comments received on the website, I am attracting new people to the hobby rather than those who have been collecting or running for some time. This is hardly surprising as my collection has no Dublo gems and a lot of other makes which probably doesn’t appeal to the collector and for the runners they have all been there and done it before and survived the problems.
So if you are not a member of the HRCA and can’t access their collection of literature and you want to know how to wire an electric point, with or without a signal then this will give you the information
However you need to be aware of the possibility of problems with electric points. I have tried three on my new layout and two were not working. I have more but careful checking is necessary but difficult if you can’t try them electrically.
SCARM
When I updated the links in November 2011 I added a new Track Layout programme called SCARM (Simple Computer Aided Railway Modeller) but confessed that I had not used it.
Now I have given it a go. It is very easy to pick up and produce a potential layout. The
programme has many track systems and you click on the arrow on the left column and there is a dropdown menu, pick Hornby and then you have a choice of 2, 3 rail or the modern track. Click on 3 rail and all of the available three rail track appears in this column. Click the top left hand corner of the scale to change to inches and use the scroll wheel on the main page to change the size of the layout. Use a right click to draw a base board and in this programme it can be an L shape or T shape as well as being rectangular. Draw the size and shape you want instructions are given.
Starting is easy. Click on the red arrow and place it on the board where you want to start. Click on the rail you want and it will appear on the board. The rail on the baseboard now has a grey arrow at one end and a red at the other. Clicking on the next rail adds it to the red end. If you want to change the end click on the grey end and it becomes red and the next rail adds here. Very simple. Curves show left or right, points give 3 choices its all straightforward. When you want to change where you are working click on the grey end of the rail, it turns red and you start again from this position.It even has a  3D option to help you visualise the layout. The only problem I have encountered is that in the 3D option you can take a
  photo of the layout as a bitmap or jpg. I have done this, the file size states that there is
  something there but I cannot see it – not sure why. So I have made do with screen shots to give some idea of the 3D capability.
The programme does have the Travelling Post Office and signals but no buildings as yet.
I think it works very well and if you are exploring layout possibilities it is certainly the programme to use.
Enjoy producing your next layout, whether you will build it is, of course, another matter.
++++++++++++++++++++++++++++++++++++++++++++++++++++++++++++++++
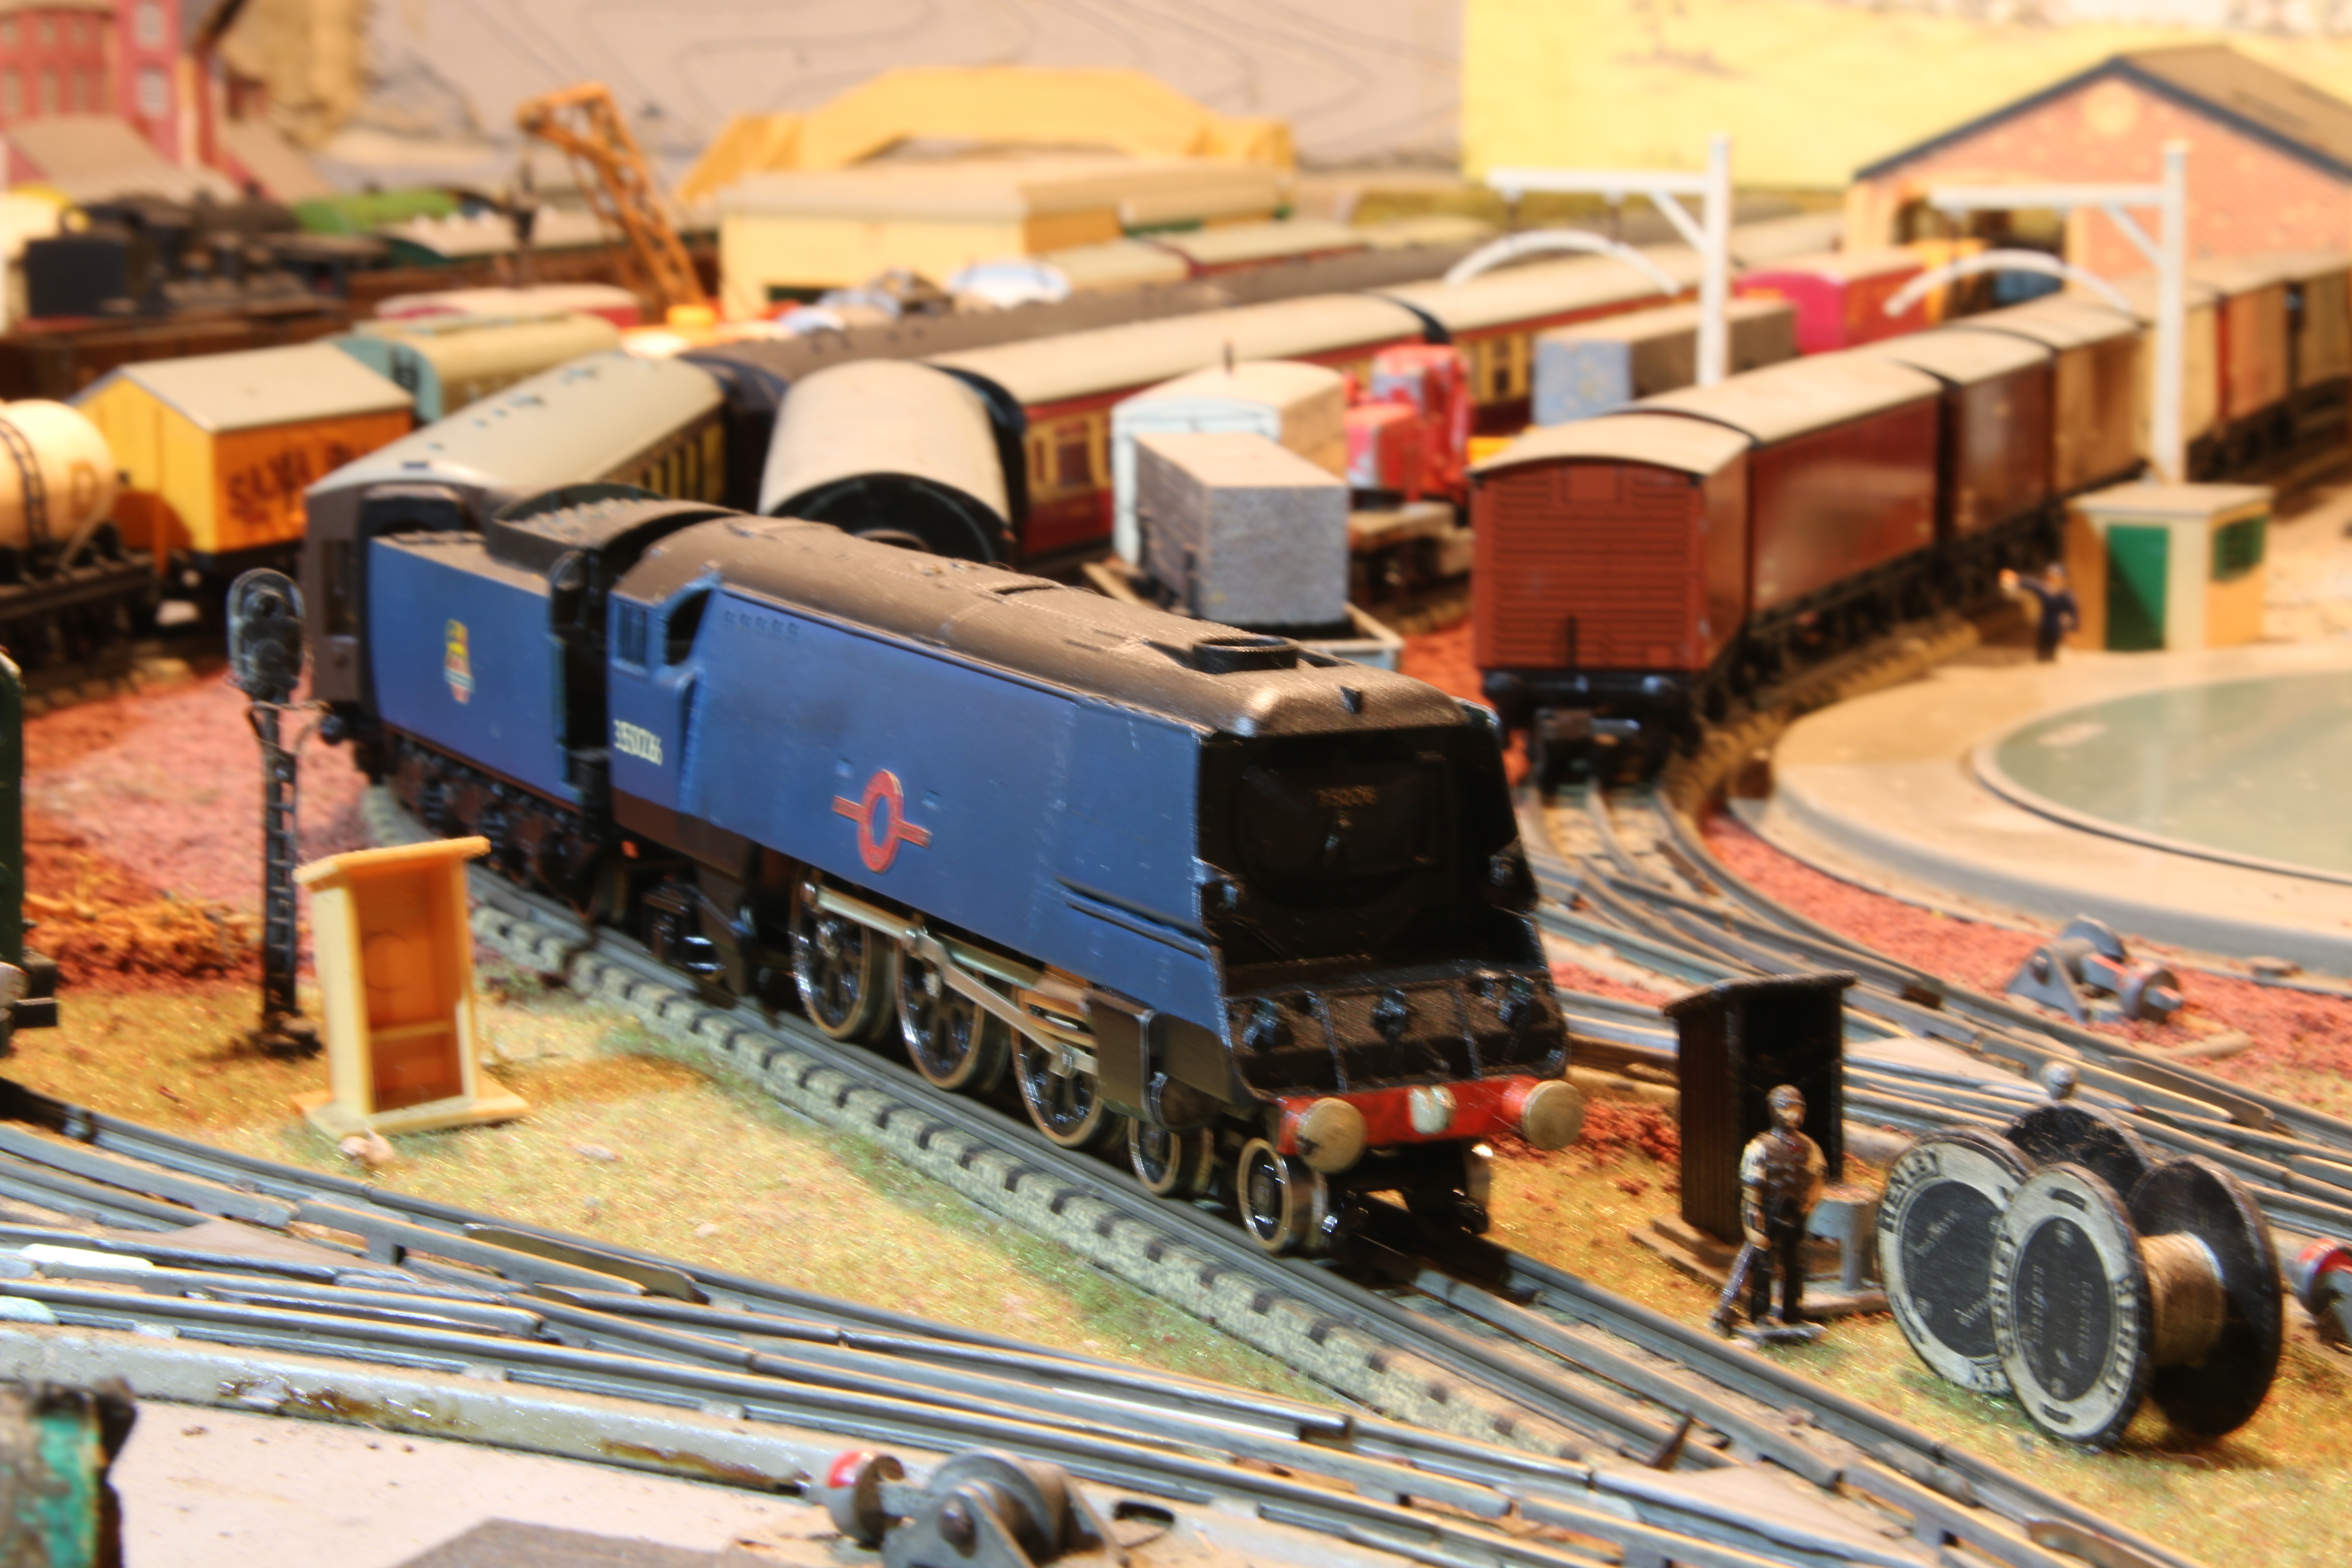
Extension to Layout – built during 2011
The new extension has been built with all the normal problems of a starting a new HD layout. These are detailed in the sections below.
 Thanks to a Christmas visit from the Boy we have a new extension to the layout on which I can build more track. The new extension is very sturdy and able to take my weight easily although I have been warned against standing on it although I am sure that it is strong enough. Sitting and leaning are all that it is likely to have to endure. So for the first time for some years, the last extension was in 2004, I am able to design, built, ballast and add scenery to a new section. Having just researched the build of the last extension I am amazes that it was built in 2004 it just doesn’t seem like that long ago.
 Anyway I am busy with Xtrkcad4 working out possible extension paths from the original layout. I am pretty certain that there will be an extension to the double track mainlines with carriage, freight and engine sidings. I also think that this will be concentrated on the up line as the down line already has the big sidings on the previous extension. The main purpose at the moment is to get an idea of the amount and type of track that I need to buy and then decide whether to go for local sourcing or use fleabay. I have illustrated the first play on Xtrk in whch I have used a Marklin Turntable as the programme does not have the HD one. I am
  told that they are about the same size. It is just there for illustrative purposes. The unattached track on the far left is there to show the extent that the extension can go without fouling the other sidings on the old board. During the course of this build I will explain more about Marklin track and running their 3 rail engines.
 There is a lot of work to do before even considering the track, painting etc but there is a Train Fair in January so it will be good to have the first idea of what is required so that I can go and have a look at what is available locally. I will be giving ongoing and detailed reports on progress as it would seem from the site statistics that the layout page is the most popular and this will give every one who wants to build a 3 rail layout some hints and tips. You will see from the post below that I did a quick layout possibility on Trkcad to see how much track that I will have to buy.
 I then used what spare track I had to loose lay the inner track between the old track joining points. On completion the temptation was to run a train. So I picked the easiest an 0-6-2T and applied the power. Off it went slowing down a little at the far end of the new section, I will need to add an extra power source here, as expected, and completed the circuit. Another couple of engines were tried but no rolling stock, they also completed the circuit. A good start I thought.
 Then I compared the loose laid track with the Xtrk and found that I was a 1/4 length rail missing on the bottom track and yet it fitted. A good look at the track showed that some of the joints were not totally square and that this was enabling the track to be joined. Squaring up the joints led to gap but not as big as a quarter rail, probably nearer the short rail. It looks as if one is required on the bottom track and another between the curves to enable a proper fit. But this is still not the same as the computer programme. Now my layout is not square as one of the walls of the workshop is at an angle so this has to be worked out as the track progresses so this is probably the reason. However this ability to join rails and make a track circuit which is not square could be the route cause of the well known problem of phantom decoupling. I will be investigating this further when it comes time to get serious about laying the track.
I have now painted the extension so that it is ready to start the layout. After that it was off to a visit to the local train fair and the purchase of some rails and points. I then had a follow up visit to one of the dealers houses to buy the rest of the track needed plus a chance to have a look at his train room in the loft. Amazing layout and an amazing amount of stock. He has been collecting for many years both dublo and Triang and he runs 3 rail and 2 rail for his Triang and 2 rail HD. Fantastic collection with rarities in profusion. How about 3 St Paddys, 4 southern 0-6-2T’s and much more. Jealousy knows no bounds when you see a collection like that. A prewar Mainline station and two of the modern plastic mainline stations one in use as a Terminal and one in use as a through station. Breathtaking.
Back to the mundane of my layout.
With the new rails I was able to loose lay what I think will be the final shape of the track, The first train to run soon showed that I had put isolating points between the mainline and the sidings – Wrong – they have to be non-isolating otherwise the engine will not run into them. I found that out on the last extension but forgot all about it. Still re-laying track is always fun.
 I have added an additional power point to each set of tracks and have also added a remote controller for each track so that I can work within the new extension and not have to keep going back to the main controller. This has resulted in smooth steady speed running throughout the layout. The total layout now has 4 electrical inputs to each of the tracks reducing the effects of voltage drop. The current wiring is of course very temporary as it will be under the base board
  when we have checked out the layout for good running.
Now to check for ease of running, de-railments and uncouplings. This will take some time
My layout has no electric points. I never saw the need for them as I can reach all the manual points although some with the aid of a metal bar assister. However on the  extension layout there is one point into the main sidings that is a stretch and is behind another line of trucks and is therefore difficult to reach without knocking over something. So, as I had an electric Left Hand point in my track box I decided to put it in that position. Rough wiring was put in place and I used the passenger bridge to guide the wires over the track. Having put it place the engine testing started. All seemed to work well on the dodgy engines. Dodgy engines
  are defined as those which have a history of de-railing at the slightest opportunity. The worst is the 2-6-4T with its front bogie when going forwards and is rear pony when reversing. This is a well known problem engine. The second one to check is the Duchess of Montrose when reversing as its rear pony wheels are prone to derail. These two were fine. So like a fool I decided to put in permanent under board wiring before completing the test work.
 Wrong.
After spending an afternoon putting in the wiring and crawling under the track I re-started testing with the other engines as well as the tricky ones. 2-6-4T, no problems, Montrose, no problems, the converted Hornby Schools class, no problems, Metro Vick the same. What’s left well I ought to try an A4 and although its bound not to be a problem and an 0-6-2T as well.
You guessed it – problems.
The tank would not go through the point at all when reversing from the siding onto the mainline, it just stopped with bang every time. Point or engine? Well after a lot of head scratching and checking I noticed that the three rail pick up was slightly not parallel so I adjusted it and bingo all was fine, Engine then. Turn it round and drive it through the points forwards and it derails just after the point. Not every time but about 10% of the time. Dodgy engine so let’s move on. Silver King is put to the test. Reverses into the siding fine but again de-rails about 1 in 15 attempts when leaving the siding.
Out comes the sandpaper, minor smoothing of rails and joins, make sure that the check rail is clear of debris and wide enough to allow the flange through, all of this done by stretching right across the layout. Minor adjustments made, time to re-test. Out comes another A4 from the stable. In and out 20+ times – no problem. Sorted. Silver King comes into play and after about 10 times it de-rails. Now Silver King sits on the layout in the engine shed and to get in and out it has to cross 5 points in and 5 out and has never de-railed once in all the time that it has been stabled there. So it’s not the engine but the point. Out it comes to be replaced by a manual one from the box, Try the 2-6-4T and it derails the pony wheels every time. Remove point and replace it with one of the boxed and very good isolating points which I bought especially for this application and which I soldered a wire between the main line joints so it is now non-isolating. Testing has restarted. What I now need though is an excellent electric point.
Judging by the comments received on the website, I am attracting new people to the hobby rather than those who have been collecting or running for some time. This is hardly surprising as my collection has no Dublo gems and a lot of other makes which probably doesn’t appeal to the collector and for the runners they have all been there and done it before and survived the problems.
So if you are not a member of the HRCA and can’t access their collection of literature and you want to know how to wire an electric point, with or without a signal then this will give you the information
 Given the position of the faulty electric point there was no way of really investigating what was going on. It was just a matter of watching the engines derail every now and then. So having removed the offending point and replaced it with a manual one I set up a small test track to try and find out what was happening and see if I could correct it. A picture of the test track is shown left. The test track faithfully reproduced the problem which is shown in the second picture. The
  engine was jumping off the track just after it had been through the point. I looked and felt and checked and looked again. Nothing was obvious but out came the fine wet and dry paper and polishing of all of the possible surfaces was done to ensure that there were no protrusions even if I couldn’t see them. After a fair amount of polishing replacing, derailing more polishing I finally got the 0-6-2T to go through the points 30 times without derailing. I thought that I had cracked it. So
  out came the other problem engine, the Silver King and it worked a treat for the first 3or 4 times and then it derailed. A little more polishing and checking made no real difference.
Two things
1) It could be that the rail at the end of the point goes slightly out of gauge and some engines can cope and others can’t
or
2) The wheels on these two engines are slightly out of gauge.
There are no other points on the layout that causes problems for these engines so it really must be the point. But I don’t think that it is repairable. I had my new points on order so it was a matter of waiting for them.
 The new electric points arrived that I had bought from Peter Davies and the key one was fitted and wired up. Trains were sent around the track and then reversed into the sidings to check for derailments. Each engine and its train were being checked out and then out of the blue the engine just stopped. The auxilliary controller showed a dead short every time one tried to start the engine. The multimeter had died over Christmas so the short had to be found by
  trial and error. The first thing to check was obviously the extension, surely it must be there. The new extension track was disconnected from the existing track. The extension connection from the main controller was removed. The auxilliary controller was wired directly to the extension now running separate from the existing track. All was fine.
So track that had been laid between 2000  and 2004 and never given a problem all of a sudden had a dead short. Now this track is screwed down and ballasted and in some places almost impossible to get at. All the trains in that area had to be removed and stored. A mulitimeter was borrowed and testing began on each track section. Everything within easy reach was OK. Sods Law was fully operational. More trains were removed cushions were laid on the track so that I could kneel on them without damage to the track and the far flung reaches of the layout were checked. A short length of track the furthest away from the front was the problem. How, why who knows but there it was.
 Unscrew the track replace the offending piece and all was fine but I took the opportunity to remove a point to a very small siding to reduce decoupling in this area and to slightly realign the track. This took a lot of time as this slight realignment seemed to throw everything off and there were derailments and decouplings. In the end I renewed all of the track in that area and started running all the trains again. For the moment work on checking the electric point installation has stopped until this section is running reliably again
 The main activity is still testing the extension track to make sure everything runs smoothly. Plus I have been standing contemplating the layout and have decided to move many of the trains from their current running track to new ones. Then you have to test if they run OK. The Wrenn Merchant Navy with Pullman has moved to the down line and the Deltic with Maroon MK1 has moved to the up line and the small oval now has urban trains rather than express. Lots of other movements as well as some new acquisitions. I now have two Graham Farish WR coaches to match the Farish Tank engine – a nice little set up.
This is not playing with trains but serious testing.
I have also been adding some buildings to the extension.
Lots to do.
Loving it.
 Although I continue to test the track especially the entry into the carriage and engine sidings I am hopeful that the two main lines are now OK and will not need changing. I have been building shops and a Cinema to add to the town behind the extension as well as a Mainline station. With the addition of a wall between the High Street and the railway this area is now nearly finished. The buildings are by Metcalfe and are very therapeutic and relatively easy to build. I think that they are much better than the alternative Superquick.
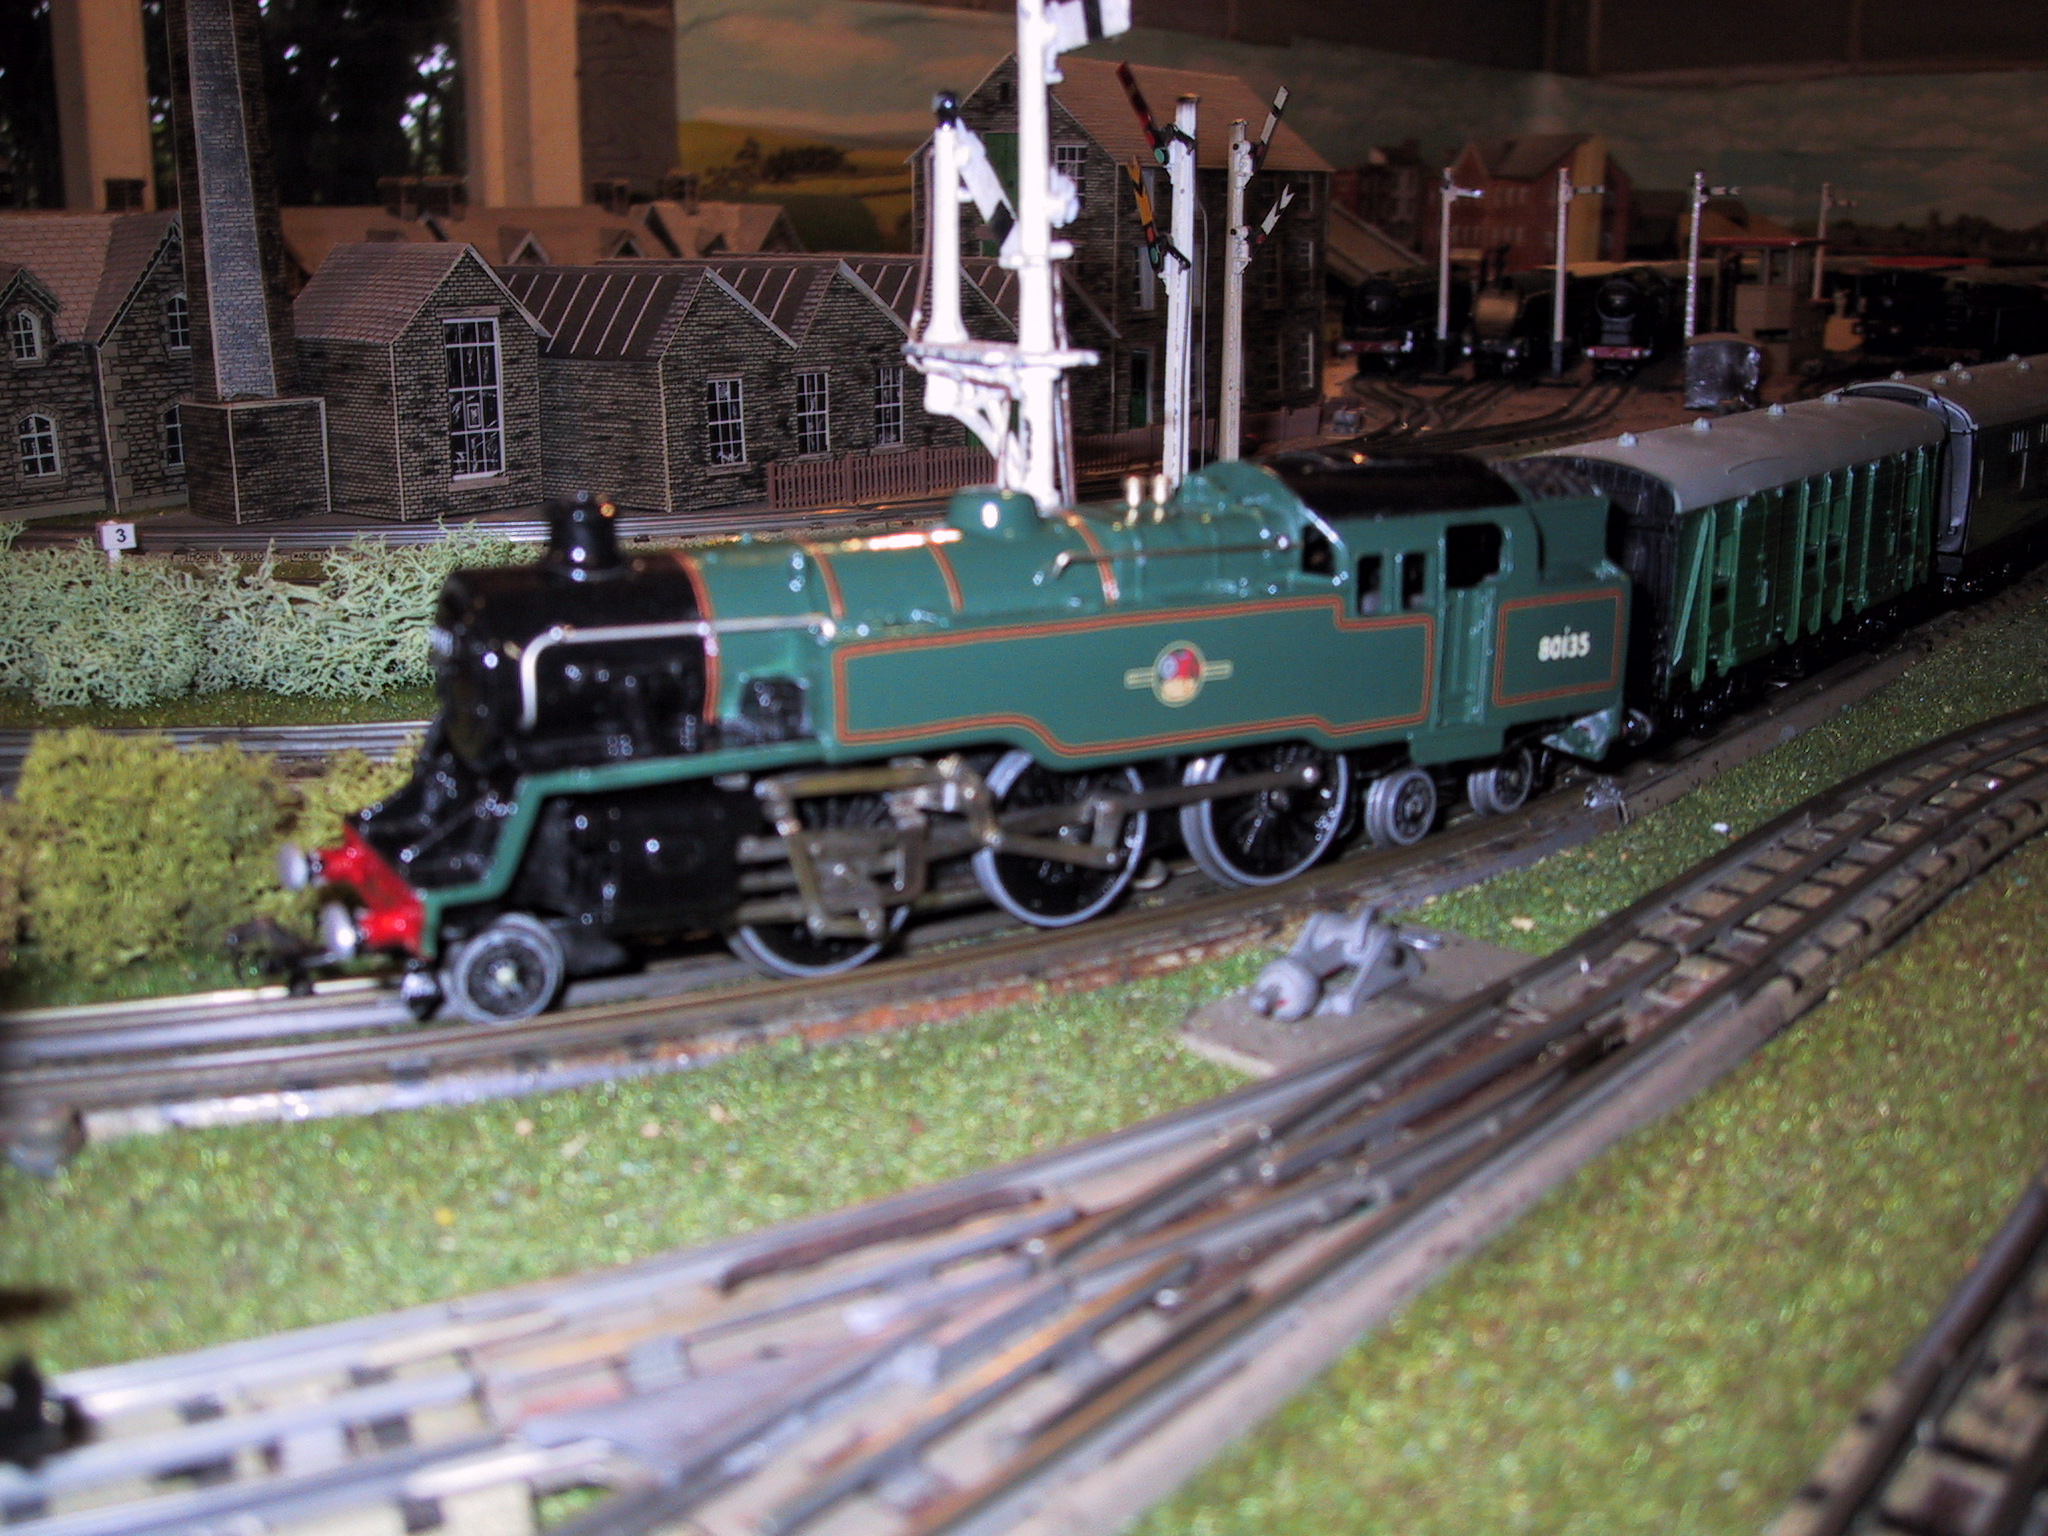
 The acquisitions are: Two mint and boxed Graham Farish GWR suburban coaches to go behind the Graham Farish 0-6-0PT. These coaches are all plastic and well detailed but do not have the doors lined out and there no running numbers just the GWR circle. Nowhere near as nice as HD possibly on a par with Triang but they at least had running numbers. This train has been located on the small inner oval which will now act purely as a suburban branch line. A HD 0-6-2T in LNER Green for the engine shed extension. and a HD BR(WR) coach plus another to come so that I can run WR trains on both lines.
Very little work has been done on the layout although regular evening running is still in progress. I have not ballasted the new sidings or even the main line. The sidings have not been done as I still have a couple of electric points that I am still in two minds whether to put or stay with the manual ones. Until I decide there is no point in doing any ballasting.
 I have built a small industrial complex in this area although this was done a couple of months ago but I have only just got around to taking some pictures.
The running has been less than successful as my new Hornby Schools class has managed to throw one of its traction tyres off and therefore won’t pull the skin off a rice pudding and one of the Southern suburban carriages managed to break its axle. Both of  these problems need to be addressed before the main season starts in the Autumn. There has been one new purchase a Hornby Black Five converted to three rail running which is a good strong runner and yet another tender drive loco. Let’s just hope that it doesn’t lose one of its traction tyre.
Just to bring us up to date. The Schools Clas has had its traction tyre replaced and now runs very well and a new wheel set has been put under the suburban carriage so this is fine as well. NO decision has been made as to the use of further electric points and so no ballasting has been carried out. Some further buildings have been added to the town but it lacks vehicles and people. This will have to be addressed.
Running is fine with no more than the normal phantom derailing in the new section. As I stated very early on in this section you will never remove all of the phantom de-rails so don’t get excited and live with it – but you have to watch the layout otherwise the train will hit the decoupled group and cause an enormous crash.
++++++++++++++++++++++++++++++++++++++++++++++++++++++++++++++++
Overview of Current Layout
May 2012
 Since I wrote the paragraph below I have done a quick SCARM version of the outside tracks of the layout. This clearly shows the reversed F formation and indicates the angle of the backwall of the workshop. The interesting thing is that the top right of the layout where the angle is most acute is not really like the actual layout. Using the actual layout in Scarm produces a non fit so what you see is an approximation of this section of the layout. The actual layout has obviously been stretched to make it work. The things that you can do with HD track and still have aceptable running. I should relay this section but I am not inclined to do so at the moment as it is the furthest away and will require taking all the running stock off the layout

The layout is the shape of a back to front F with the long side on the Left hand wall, the top of the F alongside the back wall and the shorter arm approximately in the middle of the long arm. The dimensions are long side – 20 ft, Top arm – 12ft, middle arm 8ft. this gives about 60ft of running on the two  main tracks. Each of the two main lines are operated by a H & M Clipper with 4 auxillary connections to the track at about equal distance around it. The three main sidings also have there own controller which are
  and an A3 HD one for inner circuit") battery controllers taking an input from their respective main controller. More about this later as it is a key part of the control.
battery controllers taking an input from their respective main controller. More about this later as it is a key part of the control.
The main lines are therefore set only for single engine running as there are no block sections and the sidings also use the same control function, so on this layout there is no  shunting possible when the main line is running. This just makes for the easiest wiring and the simplest operation. I use H & M clippers on the main lines as they are rated at 12V and 1.25 amps whereas the HD controllers are 12V at 1.00 amps that difference is noticeable on some of the engines and is well worth having.Having inserted the picture of the controllers it is worth pointing out that the two blue and one orange controllers behind the Clippers are
  for 14V AC operation of Marklin engines which I still have a couple operating. All of the secondary controllers give out 1 amp and the difference is noticeable when switching controllers.
The top of the F is in fact the remains of the original layout and still consists of a small oval with four sidings operated by a HD A3 controller with a single input to the track.  There is a crossover via points to the next track but this is rarely used. When using points to move from one track to another the points must be isolated between each other either by removing the joining tongue or using an isolating tab. I have inserted a SCARM diagram of the layout. All of the points are isolating. There is also an isolating rail on the bottom track of the bottom siding inside the oval. I have placed an island platform between the two sidings inside the oval. I have shown the joining of the inner oval with the two main running lines at the bottom left of the plan. The siding outside of the oval is a difficult one for reversing into due to the fact that it is mainly all curves. The original layout had two other oval tracks running around this inner oval.
I have been building up a 3 rail layout over the past 18 months with no prior experience apart from a brief attempt some 45 years ago as a child. I have found this site fascinating and informative, and can only agree totally with what you have written on the page above. I share the same sentiments concerning the running of these trains and the sound they make. I prefer litho even with carriages and was very impressed with your Trian Hornby m7 and it’s Southern coach.(I want one). Well done indeed with your whole site.
Regards Brian.
Thanks Brian, I still have a lot to add but I’m glad that you appreciate it. I would be happy to link to your website when you have one or host some pictures of your layout if you send them to
dublorunneratgmail.com – replace at the at with @. The Southern coach and M7 came from hornbydublo56 on ebay but I haven’t seen another one for sale.
I find it most heartening to read your confessions of mystery derailments and uncouplings. I tried my utmost to eliminate all those HD failures of 50 years ago with my new layout. Substantial improvements by attention to detail on design and construction but from time to time something crops up out of the blue to puzzle me.
The one item I can recommend is industrial 3mm neoprene sheet. I have covered my entire baseboard area with this ( it is 75% track anyway) Apart from levelling and sound deadening the major advantage is that it keeps the track firmly in place without the need for screws and their random effect of track distortion. Sorry to be so evangelical about this but it is very good.
tim
Hello,
Very impressed by your layout. Please could you advise me where to get hold of a 3 rail transformer. Can a 2 rail be modified? There seems to be plenty 3 rail track on ebay but no transformers. Thanks for any help.
> There seems to be plenty 3 rail track on ebay but no transformers.
The problem with Hornby-Dublo transformers are that that the vast majority of them are now over 50 years old. This presents a fairly significant problem in selling them, as “working” items, because of the serious electrical safety implications. At the very least there is a very great risk that the insulation on any original mains power cables will have gone “brittle” and that in itself is a significant electrical safety risk.
In most cases, the transformer unit itself is fine, but will need a new power cable and electrical tests for isolation/earth faults conducted by appropriately licenced/authorised person. The cost of this varies a lot but, is often a significant obstacle unless you very specifically want a Hornby-Dublo controller.
Any model train controller designed for 12V DC trains, with a power rating of *at least* one (1) Amp will be suitable for running Hornby Dublo 3-rail or 2-rail trains, so unless you do really want a Hornby Dublo transformer, you may find it generally easier to buy a contemporary controller, such as from Gaugemaster or similar, rather than using an old one.
As it happens I do have a strong personal interest in having working Hornby Dublo transformers, and being an electronics engineer by profession I have the requisite skills to do my own repair/test work on them. Just about all the Hornby Dublo transformers from 1939 through to 1964 can be repaired to a working state (though for some specific models there is not really much point in trying).
Cheers,
Bill
Thanks for that information Bill, very useful
Transformers – Hi Bill – interested in your comments on transformers (know it was last June but have just started to recomission a 1957 Duchess of Montrose set so looking for any source of knowledge!). Have been using a Hornby R918 rated at 14V but have bought a Marshall 3 from Ebay. It’s rated at 12V DC 9VA as well as having 12V AC and 15V AC outputs. All outputs test OK at no load but the controlled 12V DC shows just 7V on load and a current of 0.6A is drawn when I supply the loco. I also get the red short circuit light on. The loco drives well on the R918 but slowly on the Marshall. Question is do I have a faulty Marshall unit or is there insufficient capacity for a 3 rail system such as this? Would welcome any thoughts. Many thanks. Phil
I have placed here the original comment that Phil is referring to which was from Bill Bolton
The problem with Hornby-Dublo transformers are that that the vast majority of them are now over 50 years old. This presents a fairly significant problem in selling them, as “working” items, because of the serious electrical safety implications. At the very least there is a very great risk that the insulation on any original mains power cables will have gone “brittle” and that in itself is a significant electrical safety risk.
In most cases, the transformer unit itself is fine, but will need a new power cable and electrical tests for isolation/earth faults conducted by appropriately licenced/authorised person. The cost of this varies a lot but, is often a significant obstacle unless you very specifically want a Hornby-Dublo controller.
Any model train controller designed for 12V DC trains, with a power rating of *at least* one (1) Amp will be suitable for running Hornby Dublo 3-rail or 2-rail trains, so unless you do really want a Hornby Dublo transformer, you may find it generally easier to buy a contemporary controller, such as from Gaugemaster or similar, rather than using an old one.
As it happens I do have a strong personal interest in having working Hornby Dublo transformers, and being an electronics engineer by profession I have the requisite skills to do my own repair/test work on them. Just about all the Hornby Dublo transformers from 1939 through to 1964 can be repaired to a working state (though for some specific models there is not really much point in trying).
Cheers,
Bill
hi
can you explain in detail the use of multi power supply on long layouts?
do you wire in 2/3 transformers per track?
many thanks
nick
Nick b,
My layout is as follows:
A small oval, 4 straights, run off an Hornby Dublo A3 with a single power connection.
The two large tracks each have an H & M Clipper Transformer/Controller. The 12V variable output goes into a junction box (simple plastic wire joiners) and from this comes out 5 pairs of wires. These are attached around the layout at about equal distance from the controller either using HD connector rails or soldering one wire to the centre rail and then the other wire to the rest of the rail (that is the base of the rail). Each controller is wired the same. This gives the power boost to the circuit without significant power drop.
Then I have 2 wires from the controller from the 12V fixed output to a HD battery controller and then on to the track allowing me to control shunting in the yard. The main controller must be turned to zero power when using this controller. This controller must also be turned to the midpoint when returning to the main controller. All of this is to ensure that you don’t have a directional conflict between the two controllers.
The other controller has two wires from the 16V AC outlet to an H & M controller (Not a transformer/controller just a controller) this allows 16V AC input and 12 V variable output which is then connected to the circuit. This also allows control of the shunting and also allows me to control the trains at some distance from the main control set up.
If that is confusing please contact me again and I will try and draw a circuit diagram.
Some layouts use block sections each with its own controller/transformer by using isolating rails between each section so that there is no conflicting current problems. This allows multiple trains on the circuit as each block can have its own train. Never tried it as I like roundy roundy operations and a chance to sit back and watch the action whilst sipping a beer or contemplating the state of the world.
Hope that this helps
Really enjoyed your blog, often wondered why after completing many circuits a train uncouples or a boggie jumps on a point. Certainly keeps you from getting bored or dozeing off at the control. Once the rhythm changes you dive for the “off” for everything.
Are you OK if I link your offering to my blog?
Keith
Yes, I was only reflecting on this phantom derailing over the weekend. I keep all my rolling stock in fixed formations which is prototypical for Southern region carriages but hardly that for freight wagons.
My reason for doing this is that I run them and adjust them until they work without derailing or uncoupling and then leave them in that formation. So when I rolled out a 0-6-2T with a rake of LMS coal wagons I didn’t expect any problems as it has been in this formation for at least 2 years.
What happenned – frequent decoupling and also a derail at at least two points on the track. So I moved the trucks around, readjusted the heights of the couplings etc and kept them running until the problems stopped and the train ran smoothly again. I still find it difficult to understand the reason. Cold weather, dampness who knows.
Whats the betting that when I get this train out next time the same thing will happen all over again. It does mean as you say that you have to pay attention at all times otherwise the decoupled truck gets hit hard by the train coming round.
All the fun of HD.
Please feel free to link to your blog.
hi all great web site i have just started building a HD layout in the garage loft and im just at the stage of getting some track dowm this site has been a great help. maybe a dublo forum? just an idea?
Wonderful website – great to have a place for dublo enthusiasts (not necessarily collectors) to have a look at and comment. I’ve got a triple deck, 5 station 3 rail system scenicked (but no dublo buildings apart from one signal box – all modified metcalfe, superquick and similar or homemade). Careful placement and inspection of track and very little problems with backing trains over points, no electrical or tracking issues HOWEVER I do qualify this whereas it’s only the plastic (nylon) wheels that have had any issues. I have had not tracking issues with the sintered iron wheels. I only have loco’s with reasonable gearing – the N2 tanks are okay, the castle and 8f are great, the A4 okay. Running 3 hammants, a variable, resistance, and walkaround, and just run points selection wiring, with common earths – so there’s like about 6 wires to the whole system – DCC eat yer heart out! couplings I’ve found the worst is if the rivets are worn abit, then no amount of careful height alignment works as the coupling are free to move in the vertical plane. I just love the sheer robustness and build quality of the stuff – I got rid of all my modern because of quality issues – I had an N2 which didn’t run – cleaning and more cleaning – found two armature pole wires had come disconnected from the cummulator, so I just soldered them and built up the cummulator as well and let the brushes make a nice even surface. Runs brilliantly now – and it’s an LMS N2 too so at least 60 years old… gosh I waffle on… 🙂
muir gives us encouragement to look into and repair the smallest item. Not all of us can do it, but for those brave enough – what have we got to lose?
A recent experience here was an intermittent power loss and poor running ringfield motor in a Castle, this despite a new neo-magnet and my excellent power supply. I took the motor off and bench tested for several minutes and was shocked to observe a red glow inside. I thought I was burning out the commutator or windings and in a process of elimination I found it was neither.
The glow was coming from around the insulated brush, even with no armature installed! I pushed out the brush holder and sleeve (gingerly, hoping to salvage them) and then found two metal shavings crushed into the sleeve, so they were intermittently shorting the brush cylinder against the housing! Never seen this before and after refitting the cleaned sleeve the motor fairly zooms again now, no other damage.
It just proves, give it a go. With magnifying glasses, fine tools and a steady hand I have fixed a lot of things.
Well said Roadrunner – what have we got to lose?. Just to give an indication of my soldering ability – I still don’t really know whether to put the flux paste on the iron or solder or bit that I’m soldering, and for every successful soldered joint that I do, it tends to be about the ninth attempt at the one join. I just take my time, and not get frustrated when it’s the eight attempt and it still isn’t right and realise I have to do it again. Just make sure that the phone doesn’t ring or cousin Daisy doesn’t visit.
…then found two metal shavings crushed into the sleeve, so they… Good discovery – I wonder how many people would’ve just sold it on ebay (probably to me) rather than look at what the problem is, and have a go at fixing it…
Soldering can be a little tricky. I always use the multicore wire available in tubes. This already contains flux. One just cleans the surfaces, heat with the iron then apply the solder wire to the surface – it should melt and fuse very quickly. Do the same to the other surface (even if this is a wire) then bring the two together and heat and melt together. Golden rules – do not heat for too long and hold the surfaces together for a few seconds after removing the iron for them to solidify without moving.
Practice will get your technique quite good. If you end up with a shiny surfact on the solder joint that is good. If it looks “matt” that is bad!
Hi firstly i must coemlimpnt you on a great site. Now having a grandson I have resurrected my old HD ( and definately into my second childhood ). Amongst my locos I discoved a partly finished Wills Finecast LMS 0-6-4 2000 Class Flatiron. The plans state that it takes a Triang Standard 0-6-0 chassis. Would you know if this is the R52 which is used in the Jinty. Kind regards David
Just too add – theres about 3 locos I’ve got from ebay which haven’t needed to have their wheels scraped clean from years of build up. I think that we 3 railers get rather spoilt with great conductivity – but this means that it’s all too easy top miss cleaning the wheels. I’ve noticed that especially near the flange on bogie wheels, that build up can reshape the wheel profile coniderably (we’re talking decreasing the flange depth by around 1 to 1.5mm) which could explain some derailments… I thick the mazac “attracts” dirt and grime. cheers
I just had some more trouble with a ringfield motor that others might benefit from hearing how I fixed it. This would apply to the original vertical Dublo’s too. The motor was not giving full power even though the magnet was “good”. The commutator got a good clean to get rid of the carbon residue and the segment gaps cleaned out. I gave the bearing, shaft ends and screw grooves a thorough clean and very light oil. Still not full power. Adjustment of the spring tension on the brushes showed some promise but still not ideal. I noticed the commutator was very slightly out of round but this is not usually too much of a problem. Then I realised the brushes were somewhat firmly held in their tubes. There was a build-up of carbon dust in the tube and surfacing on the sides of the brushes. With a clean of the tube and gentle scrape of the brushes they were easy to push into the tubes and then free to move slightly as the armature spins. This made all the difference with less sparking at the end of the brushes and full revs being available. I need to look at my other loco’s now, as this can be a wider problem. So keep your brushes loose so the springs can keep the ends on the commutator as it rotates! The amount of pressure from the springs can also make a large difference to performance at various revs and loads.
Hi Roadrunner – what did you clean the brush tubes with? I have a tendency to spray everything with CRC video/cd head cleaner. I have no idea whether it works or not, I just like spraying things. Would a graphite lube spray work? I think the graphite is electrically okay…
Hi Muir.
Wow, another CRC fan – me too! But that gives me a clue – we are both in Oceania I see! I think WD40 works OK but I think CRC556 is THE magic fluid for railroad. It seems to shift all build-ups and leave little residue. It seems to restore electical contact like magic, great for around axles. I also use it to clean bushes, commutators, etc. But I use a cotton bud on those, not spray it around too much.
WRT your question I just cleaned out the brush tubes with a rolled up paper towel (obviously, adjust and roll to fit), with a little CRC on it to loosen the carbon build-up. There wasn’t much in there. The main thing was to gently clean the sides of the brushes to remove build-up to free their movement up in the tubes and get the ends of them very clean. In fact, the end where the spring presses, and the spring itself, need to have good electrical contact in my view. The commutator end needs to be rounded to the shape of the commutator, although it does wear back in after a while of running.
Its a credit to the people who designed these “toys” that one can work on them and restore them to very good working condition 50 years later!
Well, a confession, I’m a two-railer. I just converted a third 3-rail loco to 2-rail, a 2-6-4 tank. Its a pleasure to see 80054 speeding around the track and it can pull 16 carriages (I know, I’m cruel, but I had to try it). It joins a Duchess of Montrose and a CoBo. All going extremely well. Fiddly, but well worth it.
Wish I had the body-work restoration skills too – might have to work on that aspect!
Agree your comments about a power source. I use an external AC plug-pack power supply to an Electronics Australia circuit culminating in a 2N3055 transistor for my three supplies – constant current, variable voltage. They work a treat (short circuit protected!). An old power supply generally uses a variable resistor and doesn’t give an ideal voltage/current profile to the rails. It might also be dangerous after all these years as I have looked inside my old Marshall and the insulation is flaking off!
A few weeks ago I contacted the site about putting a Hornby Dublo project working, however now after mounting all the layout, the controller does not worki,(everthing is very old, gauge OO) the transformer is ok, I even have 2 , so I asked to a freind that recomend me a electronics shop to take the controller, in order to put it working,
The man in the shop said that would be easy to fix it, but now He does not have the same opinion, so does anyone has a electric wiring diagram from the this kind of controller,??
Best regards
Paulo Jacinto
Hi Paulo,
Personally if I were you if the controller(s) have stopped working for some reason, I would first try another (friends?) controller to see if that works – if it doesn’t you know there’s something else wrong, and if it does: the controllers don’t work.
Rebuilding a 50 odd year old controller/transformer isn’t really a done thing unless you really really want that particular controller.
The three rail or two rail dublo runs on any 12v controller – as long as it goes from 0 – 12 volts it’ll work.
I’m not too sure your locale, but maybe try a lima or frateschi or something initially. A dublo in good condition uses about twice the amps of a new can motor so any controller will operate a dublo loco – but probably not two.
The man in the shop has to make a living and by that the old ‘how much effort (time vs money) will this need?’ scenario takes place and it’s probably not worth his while trying to repair a fifty year old controller when he can repair 8 small easy things and get 8 times the money for the same amount of effort.
Good luck anyway,
Muir
New Zealand
Question
I knew nothing of HD until I aquired a large collection [30m track, 26 points, 6 engines, 10 carriages and 30 wagons] from a family member last month. Having set up a circular layout with double track, crossovers, marshalling yard, inner circle and peripheral branch I find that I cannot run 2 trains at once in opposite directions. I have checked all the isolating points but it seems to me to be a fundamental problem due to the fact that the metal base is a common earth, so if controllers are switched opposite ways they form a circuit and cut out. Is it only possible to run one at a time or am I missing something.
Hi, welcome to the world of Hornby Dublo.
The two sets of tracks must be completely separated electrically from each other and have their own individual controller. You may cross the tracks using a diamond crossing, there are two types for left and right hand crossing, as these are isolated and do not interefere with the electrics of the other circuit. If you wish to join the tracks with points then you must remove the middle rail connectors between the two points or put in isolating tabs. The engine will lose power as it crosses between the two tracks but momentum will enable it to pick up from the other line before it stalls. I will send you an email with the Hornby Dublo rail layout suggestions attached which should answer all your questions from a 1950’s technology viewpoint. I hope this enables you to enjoy running your trains.
the most exciting and informative website i have ever visited. you have given me more enthusiam now i am retired to rebuild my layout. thankyou
came across your site recently; and was just reading your comments above, i’ve just re-done my layout, and i understand only too well what you are talking about regarding de-railing, warped track, points and on and on it goes, after alot of experimenting and tial and error, i’ve found screwing down the track has provided the most reliable running, but i’ll qualify this; i have serviced/worked on almost every piece of track i possess, most of stuff has come from the UK, i bought four H&M duel track transformers, and i got one locally, as far as the track goes, i don’t have to screw every piece,or even use two screws per piece,what i do do, is, i use a space under the track where i put a screw through, this prevents distorting the track, and can help to actually straighten out warped pieces of track, as a coincidence, i have also used sponge on the ponys, some work – some don’t, i also use bits of spring from a bic pen on some locos as well, with careful laying of the track, i’ve reduced the de-railing to minimum now, but alot of work has gone into everything, re-setting the width of the wheels, i’ve added extra drivers to two of my ‘princess’ locos to improve the traction hence the ‘pulling’ power, i have three rails working in a ‘loop’ and a marshalling yard with various extra power sources operating, the new layout has 80 meters of track, and i’ll be using more than 20 switches to control the the electic points and isolating rails alone,
i like the dublo 3-rail because of its age and metal, i mean, some of my twenty odd locos are older than me, (53 now) some are 55 years old, and now i have worked on them, they’ll be going for another 55 or more years.
I have a double track hornby dublo 3 rail layout and wish to occasionally run double header trains. My control unit is Gaugemaster which trips out after a few laps of the track when attempting this. Can you advise on the installation of a power boosting source which will enable this type of operation? – Thanks, ‘R.G.’
Ron. Good question and something I have never done. I have an old engine which no longer works with the motor and pickups removed that I use if I want to simulate double heading. However to answer your question I had a go this evening. I have H&M controllers on my two long running lines with additional controllers for shunting as you can see from the photos on my layout. I double headed two shunters and 2 R1s and both worked perfectly with the single controller, running nicely together with no speed differential and for about 5 minutes each with no problems. I also used the “sidings” controller in addition to the main controller and this definitely speeded up the two locos. So this additional controller, run off the 14V AC output from the main controller (This H&M controller takes in 14V AC and converts it to controllable 12V DC) definitely boosts running speed. It could be that your modern controller is a bit underpowered for these old HD trains and overheats and it might be that a booster will not improve it. I will do some tests on my other line which has a shunting controller with a!2V input, 12V controlled output.
It is worth noting that the Clippers show a 1.5 amp output which I believe as they definitely give the locos more power than than a standard HD A3 controller rated at 1.0 amp. Bill Bolton is the real expert on all things electrical in HD and he sometimes reads this web site and might just give us the benefit of his superior knowledge.
Ron.
I have now double headed two 2-6-4T tank engines on the other track. Again with no problem running for more than 5 minutes and the auxiliary controller adding a little to the speed of the two engines. In this case the auxiliary controller was a 12V input 12V controlled output, a HD battery controller. No problems with my set up and a new enthusiasm for double heading my HD locos. Not sure that I will try with this my conversions as the difference in speed etc could cause big problems.
Just to update you on the double header power problem.I contacted Gaugemaster and they advised using their O gauge 100MO which gives 2 & 1/2 amps output – retailing at £84.95. The rep. said that they have sold several of these specifically for powering oo gauge double headers. (Web search showed On Tracks quoting £77.22. & Lendons of Cardiff £73.49. for this controller.) Obviously a cheaper option was preferable so I went onto e-bay and managed to pick up 2 H & M Clippers for £20 each inc. postage. Have installed these and have had no further problems, running double header 0-6-2s, 2-6-4s, & 2-8-0s all pulling 8 tin-plate carriages with ease for in excess of 1/2 hour. The extra power is immediately obvious although the control is not as fine or precise as my Gaugemaster. Thanks for your advice on this. With regard to your comments on using “gutless locos” as dummies – I have also done this but find that towing so much dead weight severely restricts the amount of rolling stock you can haul, which rather defeats the object. Going back to additional power sources I found an interesting video on You-Tube by John Chambers ( chambs123 ) entitled ‘Triang Hornby Lima – 12 Locos on Massive Power Supply’ in which he shows how to convert the old plastic Hornby contollers with the black body and red knob quite simply and cheaply to give masses of power when powered by a standard domestic car battery battery charger. Well worth watching, as indeed are any of his other videos. Thats it – I’ll stop rambling on now. Cheers & take care! – ‘R.G.’
Further to that I forgot to mention that my layout has some tight curves followed by points & diamond crossings – notorious negotiation hazards. On stright lines & large radius curves the trains can be considerably longer! – ‘R.G.’
Hi,
I have just been down memory lane reading everyone’s comments on Hornby Dublo. I have 3 rail set dating back to the fifties which I have just got out of the attic at my daughter’s request as she is a childminder and has a boy of 8 years who might like to use it. However I was concerned about electrical safety and my concerns have been reinforcd by what I’ve red here! However am I right in thinking that the gauge master controller is a safe alternative? Is it transformer and controller all in one? Presumably it must still deliver the current at 12 volts so does that mean that shocks are still possible- after all that is car battery voltage. I must say I don’t remember getting shocks when i was a child although we were very hung ho about these things in those days!
Any advice would be welcome. Incidentally my main engine is the ‘Duchess of Montrose’. Anyone know that one!?
Thanks
John
John,
Absolutely no problems with 12 volts on the rails. Children can touch the rals with no problems at all, totally sage. The Gaugemaster is a very good controller, modern and very safe. You could put in on a voltage trip at the plug but this is not really necessary. Any problems with electrics on this site refer to circuit completion to make the trains run not about safety of the voltage. It will be an excellent addition to your daughters toys and hopefully an 8 year old will appreciate it, I was a bit older when I received my first dublo train set.
The Dutchess of Montrose is one of the most common HD locos so every HD runner or collector has at least one. I have a gloss and a matte version.
Enjoy
Hi,
I’ve been building my hornby 3rail layout for about 6 years and when I first started
I had constant trouble getting the trains to run – mainly because the track was in
poor condition.
These days, when I obtain more supplies of track, I examine every piece very carefully, looking for faults.
The main problems I encounter are:
the centre rail touching the base and causing a short circuit.
the ends of the rails are bent inwards or out.
the piece has been stood on at some point in it’s long life and one rail is slanting in
towards the centre causing poor running and derailments.
As for points, the main problems are:
the point is twisted.
the check rails are bent and out of true.
I hope my comments serve to assist other 3 rail newbies out there and I’ll
gladly give any advice to anyone who asks.
Allen.
Very interesting reading this. Loads of tips/hints etc.
I too have just recovered my HD 3 rail from the loft, added to it using ebay and am considering clearing the garge for a permanent layout. To supplement this site look up raedodd5, on Youtube, very good videos on cleaning and running HD 3 rail.
One thing I can’t find is, how do you stop the mailbags going down the back of the eject door on the Travelling Post Office. Anybody?
After a house move I’m faced with building a new HD layout from scratch. Its daunting but I’ve done a few things differently with the benefit of experience. These include using softeware like SCARM to actually plan the layout. In baseboard building I’ve used adjustable countersunk feet which work great on uneven attic floors. Unlike my first layout my baseboard is built in modules (each 4 feet long) and then joined together – makes it possible to actually dismantle it. Finally, I’ve used cross battons every foot to take the board weight and pre-drilled three holes in each to take wiring when installed. Rather than ply I’ve used 6mm MDF as my board material – easier to work with. I’ll post some pics as I progress.
Alistair. I would really like to post your progress on the site as it will give inspiration to other readers who are thinking of building a 3 rail layout. Pictures and progress reports to dublorunneratgmaildotcom (replacing at with @ and dot with .) and I will set up an individual page for you on the site. Look forward to receiving your reports. I am very interested in whether the build sticks to the Dcarm layout or whether you improvise a little as you go. Certainly I built mine without Scarm or Xtrack and realise that it actually cannot be reproduced in Scarm and therefore I must have forced it to fit inn some places. Carm makes my layout at least an inch and half out but it still works.
Hi,
Congratulations for setting up a brilliant website – I’m in the (very slow) process of building a large 3-rail layout (very slow as I spend a lot of time out of the UK) to replace my now dismantled ‘Neverwass’ display layout. This will be familiar to members of the HRCA as it appeared at several HRCA shows and featured a couple of times in the pages of ‘The Collector’. The new layout was designed using SCARM but when laid out didn’t actually fit (my baseboard dims and set up was ‘spot-on’) so some ‘on-site’ adjustment was necessary. I think that SCARM is not exactly to scale and any errors, however small, are magnified on large layouts, saying that it proved to be invaluable for designing the freight yards and complicated junctions. My layout is partially operational (the inner oval) but has a couple of dozen electric points (with associated isolating rails), uncouplers and signals that still need wiring up. If you would like to see a few photos of this (and my earlier layout) let me know and I’ll send some over.
Regards
David Harrison (HRCA 4229)
Go to David’s Layout page for all the information
Greetings from sunny South Africa 🙂
Found your site by accident and wow! Some VERY useful information! Have been ‘collecting’ HD since age 7 and for past 30+ odd years (since moving from UK) have been promising to ‘set-up’ but alas everything is still packed away 🙁
2013 is THE year when I WILL start playing again with my trains !
Am a member of HRCASA (membership # 64) and although not a very active member my interest remains enthusiastic and even more so since browsing the ‘Dublorunner’ site 🙂 Keep up the GREAT ‘reporting’ and wishing everyone a FANTASTIC 2013!
VBR Nigel Rotherham – (member Hornby Railway Collectors Association of South Africa)
Nigel,
Definitely make 2013 the year of the layout as you can follow two layouts being built which should give you the incentive to do your thing
If it wasn’t for folk like us where would we be? Your site is a really useful resource of information and a diary of the trials and tribulations that infect our hobby. Thanks for showing ‘warts and all’ how we make a hobby into a lifetime pursuit. Although I model in O gauge and have an extensive layout developed over the past 5 years + I also have been collecting HD 3 rail so that i can revisit what my father bought me when i was in my early years in the 50s. They sold my railway when i was 18 without asking me and I’ve always wanted to have it back. well now i have at the age of 63!
Once again many thanks for a useful and reassurring site and to everyone who visits here please take the time to visit my site as i do share all i do, (including HD 3), with all who take the time. SCARM incidentaly , has to be the best freeware program for designing layouts. You can create buildings by using the Figures option at the bottom of the hornby listing. its crude and abit like building bricks – pre lego, but it adds to the ‘feel’ of your design.
As an adjunct to my last comments , your can get directly to the HD stuff here: http://www.axbt71.dsl.pipex.com/Projects/Hornby_Dublo.htm There are a couple of Youtube videos, (with more to follow), that show the running of my locos pulling various trains, etc, etc.
Now added to my links page
Is it still possible to get fish plates that will fit HD Three rail tracks ?
Fish plates are available from r.scott@btinternet.com
and
http://mainlytrains.webs.com/PriceList.htm
I have been logging onto Dublo Runner for a number of years now and always found it an excellent and very interesting site.
I’m pleased that you publicise my HD service video’s, so more of us HD runners are better able to look after and appreciate our trains for many years to come.
Keep up the good work.
Ron Dodd
PS Have just finished a new HD clockwork layout and will be posting it on YouTube shortly, Keep a watch out for it.
I have just found your video on the hornby magnetiser which you say you supply. However you haven’t stated a price or how one can contact you to order it. Can you advise please? ‘R.G.’
Rod I have sent you an email with Ron Dodds contact details. Ron is the designer and producer of the remagnetiser which has received rave reviews on the HRCA website forum
Thanks for the lightning info Tony. I’ll follow it up today. ‘R.G.’
Hello Hope this gets to Ron I would be interested in purchasing your magnetiser kit if possible , I enjoy your maintenance videos on 3 rail dublo best wishes Dave Meldrum near Chichester
Fishplates :- I’ve found the Gaugemaster GM19 Code 100 (00) Gauge Track Joiners to be a good easily obtained replacement. They come joined together and if you snip them off to leave the tab between them in place and bend it down slightly this will pop into the slot in the track base and stop the joiner pulling out when the track is taken apart. Worked well restoring my 3-rail track and most shops stock them or use Hattons, Gaugemaster or ebay to get them online.
Just starting to set up my HD 3 rail layout and very, very grateful for the good advice on this website.
I have many electric points, arm and coloured light signals to set up. Looking at guidance I was going to buy 100m spools of 7/0.2m wire to operate from the 12 v ancillary outpits of a gaugemaster DS controller. I would run a colour coding system and have worked out from the old HD info’ how the points etc with the correct type of HD switch should be wired.
My question is – is the 7/0.2m wire ok ?
I searched the web and have seen lots of info where modellers are running DDC and using bus systems with drop offs ( and have just about worked out what they are) and they recommend only very short lengths of 7/0.2. I appreciate that HD is a completely different system but when I went to a cable suppliers web site the question of the suitability of that size of cable for 12v rail layouts had been asked and whilst the reply was yes it had the warning – “you would need to note the current rating as it only appears rated at 1.4 amps”. I then read about cable overheating and chance of fire.
Could you guide on this please. The length of wire to a signal or point would be around 10 ft.
The DS has a 12 v uncontrolled accessory output to both Track Controllers and I was going to run the points from one and the coloured light signals from the other. They have a limit of 1 amp max’. So does this mean that the controller trips out at 1 amp before the wire limit is exceeded?
Sorry if the above sounds obvious but when I started off with it at about 50 years ago we seemed to wire this up with what every your dad had to hand!
Cheers and Happy Christmas, Bob
Bob,
Like your Dad when I built my first layout, much of which is still in use, I used old 3 core mains wire with each core stripped out and this has worked fine over many years. When I run out of old wire and the new extensions were being built I bought a real of solid bell wire which is two core and labelled not suitable for mains voltage. I have used this throughout all the extensions for additional power points to sections of the track and for my small number of electric points. I have had no problems at all and absolutely no signs of overheating whatsoever. It is all white of course so colour coding is tricky so I use a white tape wrapped around each end with the colour inked on and sometimes along the run if I remember. Bit of a bodge,my forte, but works well. I have runs of well over 15ft taking up to 1.5 amps from my Clipper controllers, at least that is what they are rated at. Never had a trip out so I am pretty certain that the wire you are looking at should be OK but I do know that the bell wire works fine. Hope this helps
dublorunner
Thank you very much for the quick reply and guidance, much appreciated.
Bob
Hi,
Since my last comments my web host has changed as has my email and website address etc. The 3RHD layout has also been extended to have a double mainline. A cattle dock and modified lorries for that and the diesel plant. I also have an 8F on the way. I notice that isolation tabs can be used to section track, but that they only isolate the centre rail. Does this cause problems if like my mainline tracks I want to drive two separate locos in different directions? Its not something I have come across before as my O gauge stuff is all DCC controlled!
http://www.bpodmore.co.uk/Projects/Hornby_Dublo.htm
Two mainline tracks have to be electrically isolated from each other. Each track has its own controller and therefore each track can run its own train. The isolating tabs are essential if you have points connecting the two tracks then you need these tabs to keep the two tracks isolated. The other use of the tabs is to produce separate sections on the mainline so that you can operate more than one train at a time. Not something that I do. Isolating the centre rail is all that is required as the other two rails are connected and are essentially earth.
Thanks for the info. I have now isolated the two mainline tracks and have separate controllers running locos on each line. I also have a third controller to work the main sidings area which is isolated from the mainlines. I now find I can drive locos almost anywhere as long as I set the controllers in the correct direction. this means I can swap trains from the sidings onto the mainline and back again and also across both mainlines into the sidings. As I built a small refinery some way from the main area I am investing in upgrading the manual points to electrical points to operate shunting of tankers in and out of the refinery off the up mainline. I believe that one switch can operate two facing points for this purpose. Has anyone experience of how good these electrical points are etc. ?
One other thing. To accommodate the sidings I have designed it has meant that some pieces of track have had to be modified, (apologies to the purists amongst us), but I have been successful in cutting to length some straight pieces of track and fitting them unobtrusively in place. One area that makes for extra space I have found is trying to fit a series of right hand points onto a left hand point to create sidings, (or vice versa), as it requires a small piece of 1/2 or 1/4 track to be inserted first as the switch lever fouls the track. If you look for the plan of my layout on the website you will see how I got round that and kept everything inline. I realise that this is me taking 3 rail beyond its original concept though, but it has meant I can do a lot in a limited space, keeping the width of the main area down to 22″ (8 tracks deep).
Brian has a really good website for his Hornby Dublo layout. Very worth reading with circuit diagrams, loads of pictures and videos as well.
Really good stuff here http://www.bpodmore.co.uk/Projects/Hornby_Dublo.htm
Thanks for the feedback,
I came across the Hornby Railway Collectors Association recently when looking for instructions on a Hornby A2 controller. I was trying to find out why there is a warning light in the body but no cover. I thought it was mine that was missing a red cover, ( like the ones on the A3 and the C3), but all images show the same thing, (just a hole in the body where a bulb pokes through). Does anyone know what the voltage of the bulb is and where they can be purchased? Anyway, the site concerned is located at: http://www.hrca.net/wiki/CONTROLLER_AND_TRANSFORMER_OPERATING_INSTRUCTIONS and I was amazed at what else was there re original copies of leaflets. Whatever you do don’t buy any go there first and see if its waiting to be downloaded!!
Regards
Brian
Hi,
A word of warning regarding passing contact switches.
I upgraded several of my inaccessible points to electric ones and decided to buy 6 Eckon passing contact switches at around £4.50 each. They were all brand new and in their original packaging. On wiring them up I found that 2 were malfunctioning and one of these was decidedly rough when used and one did not break contact with the solenoid during use. Pulling the levers is not clean and feels as if things might catch in use. When I took the problem switch apart this fear was realised and I was amazed at the shoddy way in which it was put together and even that it worked. You can see more info on these switches on my site at;
http://www.bpodmore.co.uk/Projects/Hornby_Dublo.htm
I am now about to use the same switch system I use on my O gauge layout namely the Peco Turnout switch module PL-50 and three extra switch add-ons PL-51. If you look at how the Peco switch is made there is no contest between the two and unfortunately the Hornby switches either. With the Peco switches PL-26 there is no possibility that they can short and burn out the solenoids in the points. Having said all this Eckon do make good colour light signals and lamps.
Points and signals
I’m in the process of upgrading from manual to electric points and I have numerous colour light signals which could be operated long with the point switches I have. The Hornby Dublo literature shows wiring diagrams incorporating double signals and points and I’m assuming that the power feed would be DC. (I use the 15v AC supply from an A3 controller for the lights and the 12 DC supply for the points). The points are coupled in with a CDU. My question is how can I put all three together? or indeed is it possible with the cdu? The Hornby diagram shows switch D1 controlling both but I use the Hornby on/on switches for signals at the present and can’t see how a passing contact switch would work this setup also an on/on switch would burn out a solenoid or am I missing something here?
I’ve drawn the Hornby diagram and its here on my website:
http://www.bpodmore.co.uk/Projects/Hornby_Dublo.htm
Any suggestions would be most welcome
Brian
Adding to the above, I’ve just realised, (obviously), that the signals in the Hornby instruction sheet are semaphore and activated by solenoids that’s why there is one switch to activate both. I’m trying to reduce the number of switches I have and it might mean converting all my colour light signals to semaphore.
Brian also posted this query on the Yahoo Hornby dublo 3 rail forum and received some very helpful answers so if you are interested.It is on the links page
One suggestion I had was to use an old 2 rail electric point, (the ones with 6 terminals). This I have done and it works. I cut off the track and connected up the solenoid side of the point in parallel with the 3 rail point. I then arranged that all three signals be controlled by the movement of the solenoid. Carefully wired so that each signal would show the correct road and it worked first time. This has enabled me to reduce 4 switches down to just one.
Just accidentally found myself here and have realised that I am not crackers, but just suffering the same problems as many others trying to get 60 year old kit to work well.( I had the same problem with my Morris Minor!!}
A great forum which I will continue to monitor with interest – many thanks.
What a great site and very helpful. My question is where can I purchase the cleaning fluid CRC556 and what does CRC stand for or is it a recognised name like WD40 is.
It seems like that this is an Australian product. There do not seem to be any distributors in the UK. Might have to import but spray cans could be difficult. CRC is the name of the Australian company that makes the product.
Hi everybody.
Found my HD layout packed away in a steamer chest 20 years ago while emptying dads house thought he,d got rid of it took it back to our house where it layed in the attic till my other half said now you,ve retired why don’t you have a hobby for the winter and suggested unpacking my trains to see if they still worked in my ignorance I thought that HD 3 rail was obselete and that everybody had gone onto 2 rail when I typed Hornby Dublo into Google search I was amazed to find that it was not only still being run by a lot of enthusiasts but parts were also readily available luckily I found Ronald Dodds excellent tutorials on YouTube which I think if I hadn’t I would have done some costly damage to the loco,s also Dublorunner.Com with the contributions on all aspects of running and maintaining HD 3 Rail what started as I,ll just service the engines and see if they work has now gone onto building a layout complete with Metcalfe and Scalescene buildings but also I have now started to scratch build which I find most enjoyable then there is ebay where the addiction really started to set in rolling stock and loco,s were purchased and having already got all of the steam engines Hornby made in the late fifties acquired a Hornby Flying Scotsman ,Black Five and Triang Princess Elizabeth which were converted to 3 rail as you can see this is not now just a winter hobby one year later I,m an incurable HD 3 rail nut sorry I seem to have rambled on a bit it was just going to be a thank you for your invaluable knowledge once again many thanks.
Merry Christmas and a Happy New Year to you all.
Forgot to mention don’t know if this is the same company or right product but typed CRC cleaner in eBay and there are different types of CRC cleaners and sold by UK sellers.
Still working towards my HD layout. I have quite a number of manual HD3 points and was wondering about a way of powering them. A hut nearby could house Peco units or similar as it will all be above board (what an awful pun). I also found in an old book by Carter a way of making a flat solenoid point motor that would lie beside the points. Anyone else tried DIY point motors?
Finally there is a reference earlier to latching relays. Maplins sell one for about £4. I have used it for auto reversing a prototype Meccano loco. Video here:
https://youtu.be/h9y6AUVHI8o
I am thinking of fitting it on an 00 scale multiple unit for an auto end to end system, three rail of course.
I am heartened that I’m not the only one with mystery de-ailments, uncoupling and so on. My railway, ‘Elmton’ in the attic bedroom of my cottage has been there for 27 years. We are Hornby Dublo die-cast and tim plate running on Wrenn 3 rail track. We are fully sceniced with Bilteezi and the idea is to make it look as if the railway was assembled by a schoolboy in the 1950s. This year we have been replacing the HD suburban and corridor carriages with Exley ones. To date we have 11. Power is by a Gaugemaster single transformercontroller unit for O gauge to give plenty of power as the layout is 25′ X 15′ and I have noticed voltage drop with old HD units in the past.
As real trains do not go round and round, we are a U shape with trains emerging and entering tunnels. The layout can be operated 2 ways: run trains from A-B and vice versa, or concentrate on the station area that occupies one side of the room 25′ long for shunting movements. The heavy die-cast mineral wagons are my favourite and we have an extensive coal yard. Points are operated by dowelling under the baseboard, protruding from the edges. Due to a shortage of track, we are a single track branch line with two through stations: Doe Lea Halt and Elmton. The bend of the U at the far end of the room is HD track as the ancient Wrenn track will no longer bend. It is hidden from view in a deep cutting, also trees placed to hide it. We mainly use tank engines -4 X 0-6-2T + 2 X 2-6-4T and a single tender type (Montrose). Short trains of 4-5 wagons plus a brake or a couple of carriages. This year I bought a 2-rail Bo-Bo and a 3-rail Co-Bo. Bought the plungers to convert the Bo-Bo to 3 rail. Poor running/stopping/de-railing etc, etc. They are more trouble than they are worth.The little coal tanks (as I call the 0-6-2T’s ) are far more reliable. They are good revenue earners. Now all we have to worry about is a National Rail Strike! Our lot will come out too!!!
David,
This seems like a very interesting layout. If you have any pictures I would be very pleased to post them.
I noticed someone asking about repairs to old transformer/controllers. For many years I used the HD one with the handle. One afternoon I was ‘up there’ and noticed a funny smell, then smoke coming from the unit. Quickly unplugged and cut the wires to the baseboard and dropped it out the bedroom window below. Later binned it.
PLEASE PLEASE do not used old stuff like this. BUY NEW! Bad fire risk also electrocution. Please be guided by my unfortunate experience. I have been using my Gaugemaster for 8 years. Brilliant.
Hi Dublo Runner!
Love your web site and return often and to peruse your links and other updates.
I have made 3 short videos of my 3 rail HD layout and wondered if you would be interested in posting a link to these?
Denis, Very happy to add your videos to my links. Please send me the URLs. Thanks
Hi Tony–the 3 videos mentioned can be found on You Tube, under my name followed by: Fast Mail; Slow Goods and Dublo Daze. Check them out and see if worthy of your great web site!
-If you have a long layout you need to add electrical boosters, wires from the controller to various rails around the layout. My layout has 3 boosters per track.
Hope you receive this , when you mean add electrical boosters what does that mean
If you have a long track it can suffer from voltage drop off around the track as you get further away from the controller. For a normal length of track (say 25ft or so )a pair of wires from the controller to the terminal rail is sufficient. For longer tracks (mine is well over 100ft) take extra pairs of wires from the controller to the more distance areas and use extra terminal rails or solder them to the track. On my layout 2 wires go from the controller to a terminal box. 4 pairs of wires go from this to various parts of the layout giving roughly equal track distance between each “booster”. If you are still not sure get back to me and I will post a picture.
Having just started rebuilding my HD layout (based on an extended version of that I played with as a child) I can relate to all the comments and problems noted. I must say several of them occurred when I had my original layout and are unrelated to the 55 years that have passed!!
I find the comments excellent and most helpful and thank all contributors.
A couple of things I have come across on which I would welcome comment.
The first is relating to the HD turntable – it creates a “hump” in the track which can cause derailing. Has anyone else had such problems? I have packed up the track on either side to reduce the problem.
The second relates to a control panel I am trying to set up. I can get the electric points to work OK with sprung “on-off-on” toggle switches but as yet have been unable to work out how to get an LED to light up to show which rail is running. Any ideas?
Hi,
A bit late in replying but I have a couple of suggestions re colour light signals. First they are not compatible with points because one needs a momentary switch and the other needs a continuous switch. The first option is to have a switch for each item or to tag pairs of switches together, (but this results in loads of switches if your layout is complicated like mine has become!) . I have also tried using latched relays to connect colour light signals to electric points so that the signals show which road is available, but this means building a simple circuit for each arrangement – but you only need one simple switch to operate it – a reduction by 50% of the number of switches you need. A third and a new for me development is the use of rotary switches. I have completed two projects using rotary switches and push buttons on a small control panel that seems to work, ( I always use a CDU though for the points). I am about to embark on a next stage of using a rotary switch to control a mainline station with two roads off line. All the details are on my website and can be accessed from either the home page or the projects section. I will be replacing all the bulbs in my Hornby signals with LEDs and have worked out a straightforward way to do that – also on the website.
Theres a new batch of locos as well with new magnets in them and the original layout has now grown beyond its original inception mainly due to Michael Fosters Book on HD3R – If you purchase or already have one be careful its contents are highly addictive!
Ah, the ‘trials and tribulations’! This was brought home to me last month when I built a small, but completely operational model railway layout/diorama for a friends conservatory. Its 6 feet long and 15 inches wide. Peco setrack 100 with 1point for a kickback siding. All engines and rolling stock bought secondhand from ebay and are kit built GWR. When set up to run, no derailments, stalling, stuttering et al. Track is new.
So nice to see your enthusiasm and love for the three rail.I have been working on a layout on and off for the last year, I have a dual track set up so trains can run in opposite directions.To complicate maters I have two sections of shared single track .
Evan with isolated track sections on all loops there is interference between the two controllers. I have customized sections of track so the base and outside rails are cut through , this seems to solve the problem. I don’t understand why I had to do this as the controllers have separate windings and there is no mention of any of these problems in what little Hornby literature I can lay my hands on . Any thoughts would be very much appreciated.
Kindest Regards
Kriss
Hi,
New to Hornby Dublo 3 rail modelling. Could you please advise me the difference between isolating and non-isolating points and what is their purpose,
Many thanks,
Barry
Hi,
My 3 rail track is now 60 years old and my grandson and I have decided to do a model railway layout and get it all up and running again, I still have all the original track and a Bristol Castle Loco, unfortunately I can’t find any screws that fit the 3 rail track, have looked on various websites to no avail, can anyone tell me which size I need???
Thanks
Derek, Screwing down your track is the very last thing that you should do. Loose lay it, check carefully that all your trains will run without problems. Take extra care with points and make sure that the engines run smoothly over them. This also enables you to adjust your track and add sidings etc. Then, and only then, you can think about screwing the track down. I will look up the screws that I used and I will post them on this site. Screwing the track down brings its own problems so you have to go through the whole business of screwing down, running a train. then screwing the next section, running a train and so on, otherwise you will find dead shorts if you try to do it all at once.
Ron Dodds on screws -The best screw I have found for Dublo are made by Spax 2mm x12mm counter sunk screws, they have a slightly domed head also. B&Q used to stock them but no longer, you may be able to find them elsewhere though. (let me know if you do find a supplier) These were also used by Bob Field whom also would like to find a stockist. Other wise I would recommend trying 2mm countersunk screws as they have smaller heads and also sit lower in the track hole and locate the track better than round head screws without squashing the tinplate. This was a reply I obtained my brass wood screws from: thesitebox.com, Quick service, fair prices, PayPal, all cards.
Tony thanks for your advise I will certainly do this when I get round to doing it.
Ron thanks for your comments, I have actually managed to find some screws that fits the 3 rail track in Wilkos no less. I have also used the remagnetiser which did a great job – thanks.
Regards
Derek
I am in the process of constructing a Dublo 3 rail layout on an 8′ x 4′ board and am at the stage of beginning to wire everything up and test it prior to fixing everything down. I have finished testing for clearances (and had to modify the trackplan slightly as a result) but I was wondering if anyone has comments on the following:
Are there any pieces of rolling stock that are particularly suitable for testing the running qualities of the track? As far as locomotives go, I have everything except the Southern Region EMU, as well as a Trix Britannia, Warship and 0-6-2T. I would prefer to do a fair bit of my testing with a locomotive that is one of those more likely to give trouble on dodgy track if possible.
Also, when it comes time to screw down the track, what is the best type of screw to use? The advice from Meccano Ltd in the rail layout plan books was to use number 3 round head wood screws, but I have noticed a lot of people talking of using countersunk screws. I would have thought that countersunk screws would not be the best choice, as the holes that the screws go in are themselves not countersunk, or am I missing something here? I realise that, whatever type of screw you use, there must be no risk of the head touching the rail or being high enough to touch the locomotive pickups.
I have bookmarked this site, as I can see I will be coming back over an over again…..
Congratulations on building a 3 rail track. I have always found that the most sensitive loco is the 2-6-4T as the two wheeled bogie is very sensitive to misaligned points and to track variation generally. A further test on points is reversing a Duchess through them as the pony has a tendency to derail if there is the slightest irregularity.
Best type of screw: Some comments from the HRCA forum
Usual recommendation is 3/8th No. 3 slot head brass wood screws, or longer if going through cork or similar underlay. Whichever screw you use, tighten just enough to hold the track. Overzealous tightening tends to slightly deform the track base, which pulls the outer rails together, slightly narrowing the gauge.
I use dome-headed brass 3 x 1/2″ screws from a company called Screwsline, easily found on-line. My track is mounted on cork on top of 9mm ply, and I usually drill a small pilot hole first.
I recommend either 7/16″ or 1/2″ #2 slotted round head steel or brass wood screws. They are perfect for track, signals and other accessories to be secured to the baseboard.
Next time I build a “permanent” layout (which is planned!) I will use plywood boards with 7mm foam carpet underlay to deaden the sound, as I do for my loose-lay layouts. The screws will need drilled pilot holes. Thanks for the reference to Screwsline. I have been looking for a source for 5/8 x 3 screws.
Ron Dodds has made a video on cleaning, inspecting and laying 3 rail track including the screws and more, take a look here
Thanks for the reply and the useful information it contains.
As I am only into the early stages of testing, I am not screwing anything down yet, but that information will come in handy soon.
I now have my sole 2-6-4T and ten of my Duchesses (actually, if you want to be pedantic, seven Duchesses and three Cities) sitting around the layout for testing purposes. So far I’ve only tested the outer and inner loops and reverse curve, but that involves traversing most of the points on the layout plus a diamond crossing. I found that the locomotives more or less run well – the 2-6-4T appears to be thinking of derailing at a couple of spots, but hasn’t yet and, with the Duchesses, one occasionally derails at the same point, with both the pony truck and the front wheels of the tender coming off the track and another derails (pony truck again) when running in reverse, but only when running at excessive speed. I haven’t tried all the Duchesses out around the track yet though.
I have seen some of Ron Dodds’ videos before, but not this one. I have quickly skimmed through it to see what’s there and, when I have the time for it, I’ll go back and watch it in its entirety.
Hello Tony, COVID-19 seems to be giving us time for our trains. Possibly the only good to come of it.
I have a couple of HD 4025 2 rail SR Suburban coaches which are in good order but require some retouching to the green sides. My question is do you know if paint, possibly Humbrol is available for this? Being in the US where there are restrictions on mailing paint, even tiny tinlets of Humbrol tracking down the correct colour requires knowing what to ask for.
Other than that Northern Heights is enjoying regular servicing of motive power and adding of detail to fill in the gaps of landscaping. I have even managed to slip in a few extra buses and cars.
I like your latest Neverwas locos entry. That someone spent so much time modifying an N2 body then mated it with a poor running chassis seems strange. Keep well.
The HRCA does have a paint matching section on their Wiki but the SR carriage colour is not among them. Phil the spares coordinator does mention Montana RV-5 Lutecia green as being the nearest match. However this is a spray can so not sure that it would be suitable for touching up. It does seem to be available in the US. Alternatively take the carriage to an auto paint shop and see if they can match the colour. Plenty of room to add more photos of your layout to the site. Keep safe
Thank you Tony. Two suggestions that I shall follow up on. Various large home improvement stores can match any colour but that’s in Latex. It will be interesting to see if an auto paint store can do it in enamel. I’m not sure what the reaction would be for asking for 1oz?
I’ll get around to updated photos of Northern Heights soon. Thank’s for the invitation.
What great find this site is!
I am resurrecting a childhood Dublo layout for my son; it is interesting and exciting that there is more info around these days because of www than in the 70’s.
One qsn – the above page refers to xtrackcad software for planning layouts and i followed the link to have a look at it… It would seem that you need to be a computer programming whiz to set up xtrack… umpteen downloads, unclear “build” instructions, strange programmes, etc. Is it just me or this software is way beyond the abilities of the average computer user?
Cheers
Stephen, Many thanks for your kind remarks. It was a long time ago that I used Xtrack and I do remember that it was clunky in the extreme and very important that that the track you used was HO which of course HD runs on. I changed to Scarm as soon as it was available. It then went behind a paywall but they now do a freeware download which is very adequate for most purposes. I would suggest you switch to this programme. It still takes a bit of learning and application but is basically more simple to use. Like all of these CAD based programmes it can be very frustrating when you can’t attach the right rail in the correct place but it seems that practice helps. You can spend happy but sometimes frustrating hours producing your ideal layout. I did think of doing a portable layout based on an internal door (the largest width available from B & Q) but moving a door around in a hatchback is not easy so I gave it up but did produce a Scarm version of a possible layout and I found that it was pretty easy to use although frustrating until I got the hang of it again. The results are Sorry I can’t post pictures here see the front page for them
The red arrow on the top loop indicates that the two rails do not meet exactly – you could either spend a lot of time getting it right or just take advantage of the fact that in reality they will join together with little or no problem. Although HD track doesn’t look at all flexible there is in fact a little give which can be used in these instances.
Just a hint to start with. To get to HD go to the top LHS side of the page just below the icons there is a dropdown menu, click on this, go to Hornby(4) click then you will find HD 3 rail – click on this and you are ready to drag, drop and join the rails, points etc – good luck
Thanks for yr reply and thrilled to find that site is active.
I managed to solve the software problem by downloading an earlier version xtrack to suit older Windows 7/XP.
As you say, a bit clunky…
Will check out SCARM freeware, thanks for tip.
HDublo locos – remagnetise or Neodymium?
The locomotive i had and others I have bought Ebay and from shops are all obviously getting on in age and like all of us, their performance is probably starting to go downhill… 🙂
I have read and seen videos of a remagnetising process/machine and also read about Neodymium magnets. I am not sure there are many people offering remagnetising service in Antipodes? Alternative is to buy a machine (for three locos?) or put in Neodymium magnets. The Neodymiums are apparently not recommended for newer brands of locos but are they OK for HDublo? If so, do they have to be exact same size as HD Ones?
Love to hear about people’s experiences.
Neos as replacements tends to divide the HRCA. I have done both. I bought a Ron Dodds magnetiser last year and have used it to refresh many of my locos but I have a great many of them and it probably makes the purchase worthwhile. For the 20 years previous to the purchase I used Neos if I had a poorly loco and they work very well. The discussion among the experts is that that they are too powerful and pull the armature towards it and can thus cause uneven wear on the commutator. My take on it – they are probably right but it won’t cause a problem in my lifetime and probably not in the next owners either. I fitted my first Neo many many years ago and the loco is still running perfectly as are all the others fitted with them. I would make sure that you use the right size. I have always bought mine from http://www.superneomagnets.com/indexSO.htm
As an aside I also bought my controller off him and have always received excellent service. Most of the spare suppliers in the links do sell them.
Another technique is to use mini Neos and add them to the existing magnet as a helper. This method seems to be more acceptable to some of the experts indicated above as it means you don’t overload the system and might be more available locally. Just search for minimagnets on your local ebay
Welp, I’m just learning how to do Dublo and having read this, I feel a lot better about the issues I’m having. Great read chap
Hi Tony
I am looking to restore a couple of HD 4315 horse boxes which are always missing some doors or cost a mint. I propose to make doors out of plastic sheet which will then need to be painted same as rest of wagon.
Can you tell me the paint brand and name most like HD wagon maroon?
Have looked www but only find paint comparison so for locos.
Thanks
Stephen
No need to make your own doors. Replacements available here https://www.shapeways.com/product/SJMSVC4X3/hornby-dublo-doors-for-br-standard-horsebox
But the colour. Might be worth asking Shapeways when you order the doors. It could be BR Maroon or Bauxite.
Railmatch BR Maroon https://howesmodels.co.uk/product/br-maroon-15ml-enamel/ might be a starter pack to mix the right shade
Bauxite – You could try here https://www.ralcolorchart.com/ral-classic/brown-hues and then put rotbraun in the search engine which comes up with this
https://www.ralcolorchart.com/ral-classic/ral-8012-red-brown. Given that code a motor factor should be able to make up a colour match aerosol
Not sure that either is correct because it depends where and how your wagon was stored.
You could run with the doors open as the padded material on the inside of the doors would have been a different colour to the outside
Just thought it could have been green. Probably best to try Railmatch Malachite Green or Olive green
Hello, I am rebuilding my 1950’s 3 rail on a 12x10ft baseboard and have supplemented my rails over the years buying up second hand bundles and of course ebay. Two questions. Is a 1.5 amp current sufficient or do I need 2.5 amps, I have been given conflicting advice on this point from train shops. Also the rails are extremely grimy of course, what is the best cleaning agent? Thanks.
Ian. Most HD locos run at 0.5 amps or below, So even with double heading a controller giving 1.5 amps is fine. I do not know what controller you intend to use but I would definitely suggest that one that can give 15-18 volts is a worthwhile investment as all HD locos will tolerate this and some need the extra voltage to overcome age and general wear and tear to operate at normal speeds. If all of your locos are in perfect mechanical condition you don’t need it but not all of mine are. There is a discussion on controllers in the recent posts section that might be useful
Hot soapy water, nail brush or old tooth brush followed by drying in the airing cupboard if you have one. If not place them on top of the radiators or have a look here https://youtu.be/7mTMn1C3GbY and here https://youtu.be/2OrEbLzaSTo